black and white

COMPOSE THE SCENE, THEN WAIT

1/1800 @f4.0, ISO 200.

The title of this blog comes from something Sam Abell* said during his presentation, The Life of the Photograph, at OPTIC 2017. I have watched and rewatched that presentation several times now and there is no doubt that I will watch it again.

During the presentation, Sam takes us through his thought process when making a photograph. But this idea of finding a scene, composing the image and then waiting, really stuck with me. I struggle sometimes with the patience that is required when photographing on the street. Why can I sit for hours waiting for just the right light when photographing landscapes, but while walking the streets of a city, I move as fast as the pedestrians around me.

1/1600 @f4.0, ISO 200.

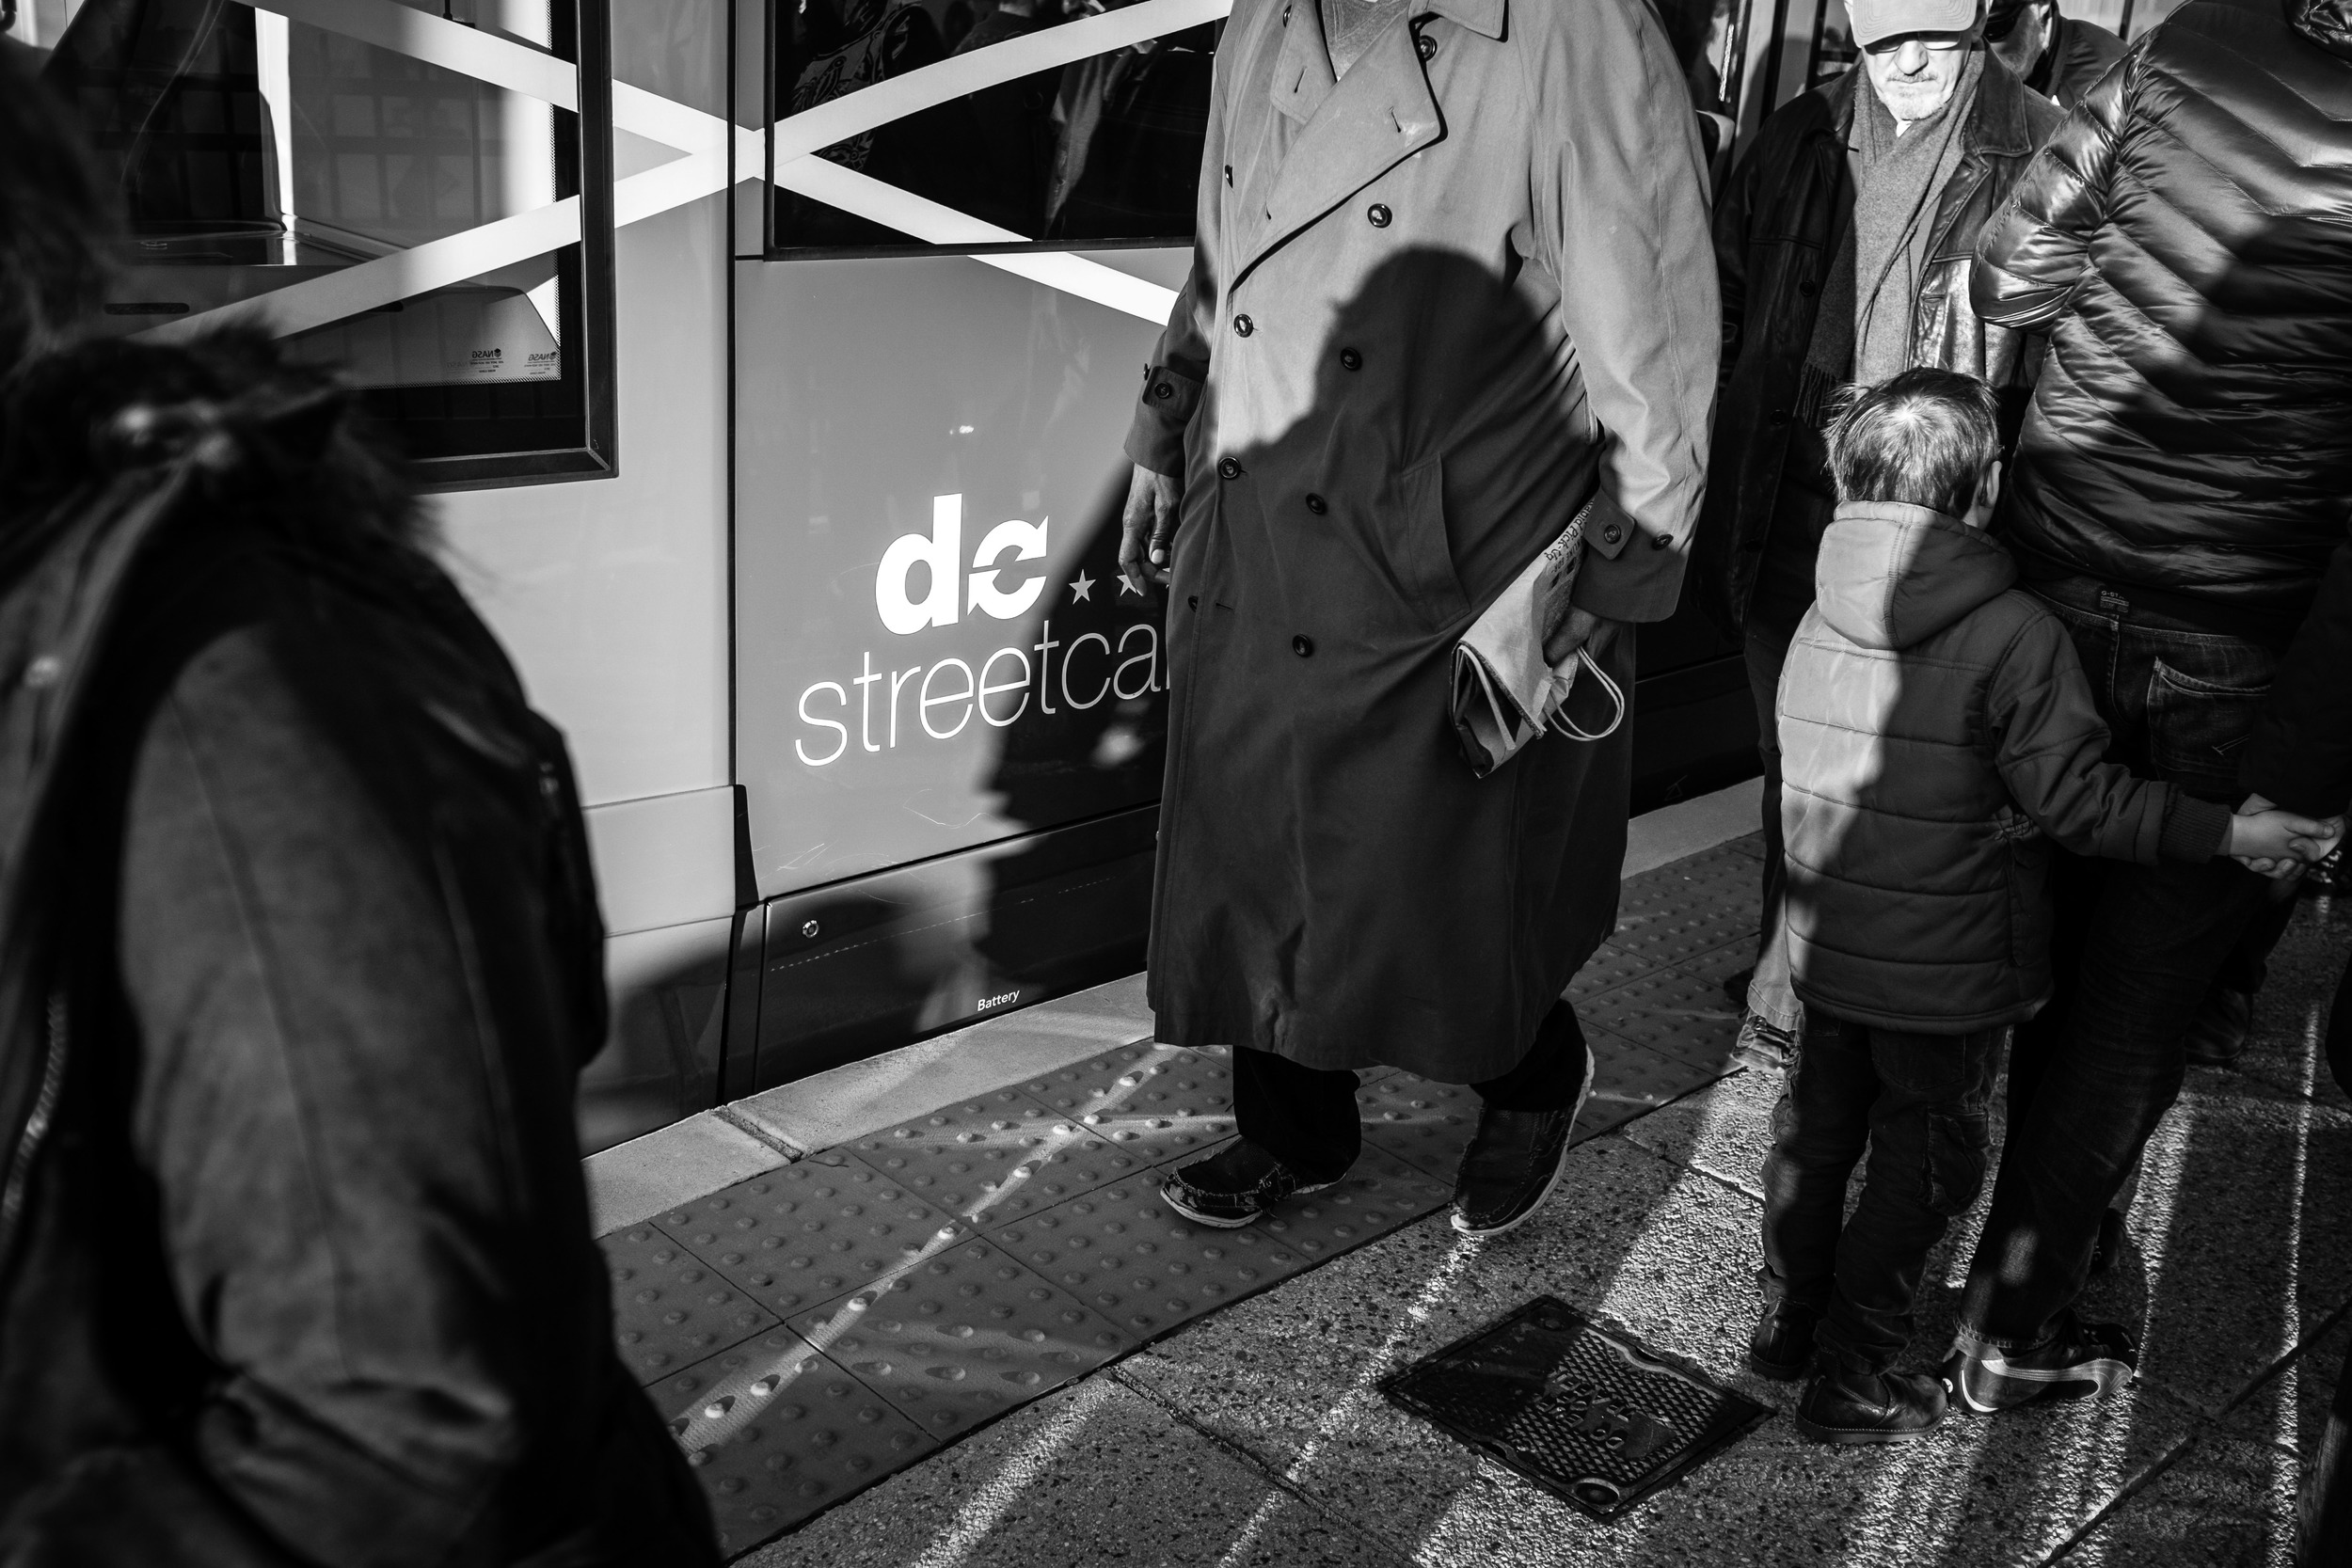
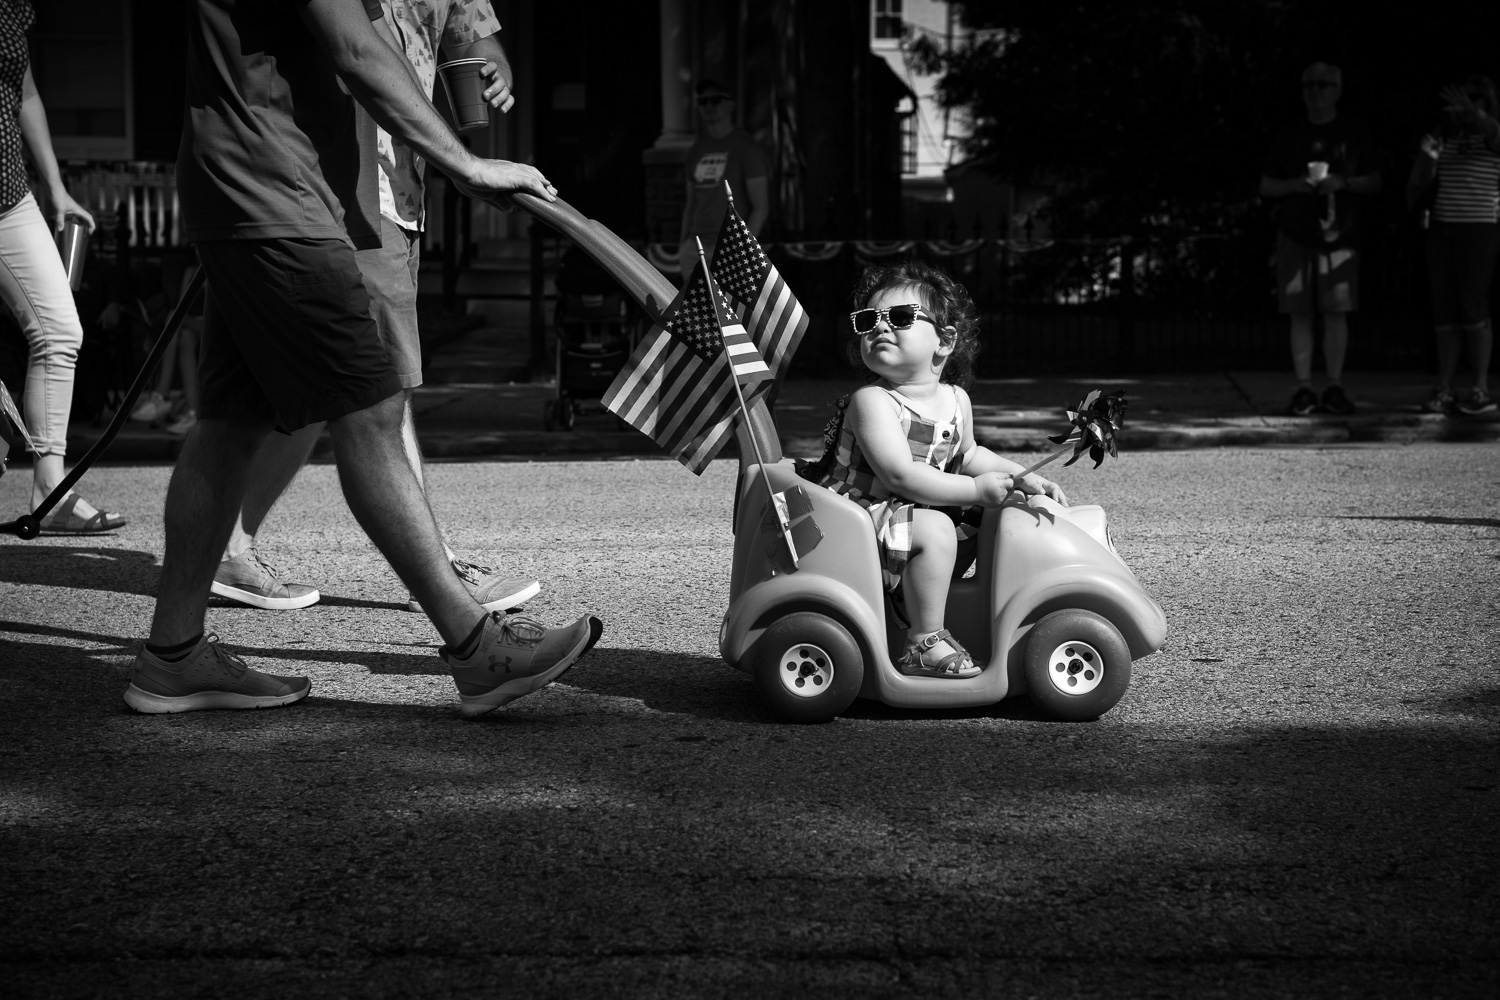
As I set out to photograph the 187th Indepence Day Parade of Churches and Sunday Schools in Roxborough, Philadelphia, I decided to test out the idea of just staying in one place, with one lens and let the parade pass me by. Not a real stretch I know, but it was the idea of finding the right background and light and then waiting for the uncontrolled action to pass in front of my camera.

I walked most of the parade route and finally settled on background that was fairly uncluttered and in the shade. There was also shade on my side of the street which meant the foreground would be in shadow as well. That provided natural framing if I exposed for the light that would fall on the parade goers. 

1/2200 @f4.0, ISO 200.

With the background picked, I finished off the composition by selecting the Fujinon 50mm (75mm equivalent) f2.0 lens attached to my Fujifilm X-Pro2. This focal length meant I had only one or two shots before the subjects passed by. The benefit of a parade, of course, is that you can see what's coming and know they are not going to change their course. The downside is that you can't control who will plant themselves on the opposite side of the street to watch the parade. Or that it would be the one July 4th parade-goer who wore bright orange instead of red, white, or blue.

In deciding what to photograph, I looked for color, flags, and enthusiasm. I did choose to present all the photographs in black and white, and not just because of the previously mentioned, man in orange, but I liked how the contrast of light and shadow, put all the emphasis on the subject. 

1/3000 @f4.0, ISO 200.

This parade is not like a typical parade made up of marching bands, fire trucks, and floats, but consists of parishioners from all the churches located in the Roxborough section of Philadelphia, 15 participated this year. There are a few classic cars or perhaps a band made up of from the congregation, but it is really just a way to start Independence day before they head to their church for a picnic.

I'm happy with my results although I keep wondering if I should have chosen an alternative spot as a backup or would it have been better to pick an interesting group and follow them along the parade route, however, I think as an experiment it was best that I just stayed put.

* Sam Abell is an American photographer who has worked for the National Geographic Society since 1970 photographing more than 20 articles on cultural and wilderness subjects. In addition to numerous books, he lectures on photography and has exhibited his images to audiences around the world.

SALTON SEA - A PHOTOGRAPHIC STUDY IN BLACK AND WHITE

Salton Sea State Recreation Area. 1/640 @ f8, ISO 200.

I don't exactly remember when I first became aware of the Salton Sea. It may have been something I read, or perhaps I saw a news report or documentary, but I do remember being fascinated by this place.

A few weeks ago I finally had an opportunity to spend a day exploring a few of the communitites that remain.

North Shore. 1/750 @ f8, ISO 200

Heading first to the Salton Sea Recreation Area, I had to pass through North Beach and the desolation became apparent. Empty lots where houses would never be built, abandoned gas stations, motels, and stores are the first thing I noticed, and what I expected to see. 

North Shore. 1/640 @ f9, ISO 200

However, the recreation area was a surprise. It seemed like many other recreation areas throughout the country, campsites, a camp store, small beach with pavilions, picnic tables, and grills.

Salton City. 1/350 @ f11, ISO 200

But like all the other locations I would visit over the course of the day, something seemed slightly off. Maybe it was the lack of people or the overall sense of failure. I don't mean failure of the people that remain, but the failure that comes from a dying sea. The failure to sustain life due to an increase in salinity and pollution over the years. 

Salton Sea Beach. 1/240 @ f8, ISO 200.

I knew before I took my first photo that I would present them in black and white. Even in color, there is a monochromatic look to the area. I also shot all the photographs with the same lens, a Fujifilm 16mm, f 1.4, and from a similar height. That common perspective is what I was looking for in order to make this a series. 

Salton Sea Beach. 1/750 @ f8, ISO 200.

With a large waterfront in one direction and mountains in the other, I can see why people were drawn to this location. And perhaps if you look deeper, why some people reamain.

Desert Shores. 1/340 @ f8, ISO 200.

I never made it to Bombay Beach or Slab City and did not interact with any people. I hope to change that if I have the chance to return. Mostly the people. I'm curious what it is like to live on the Salton Sea. And I know it is people that will add a warmth and bring my photographs to life. Maybe even show that the Salton Sea really is alive after all.

Desert Shores. 1/250 @ f8, ISO 200.

PHOTOGRAPHING DAY ONE ON THE DC STREETCAR

Fujifilm X100S,f8.0 @ 1/800, ISO 400.

Fujifilm X100S,f8.0 @ 1/800, ISO 400.

On Saturday, the DC Streetcar began carrying passengers along H Street, so late in the afternoon, I decided to check it out.

To get the first photo, I positioned myself close to the edge of the platform in order to capture the driver and the waiting passengers as the streetcar approached the platform. I was somewhat limited because on this first day of operation there were plenty of volunteers on hand to keep people from doing exactly what I wanted to do, which was get closer.

I like how the shadows create a criss-cross pattern on the platform, mimicking the design pattern on the side of the streetcar. Additionally, I like that the light illuminates the boys face to the right, which makes a connection to the light on the driver.

Fujifilm X100S,f4.0 @ 1/900, ISO 400.

Fujifilm X100S,f4.0 @ 1/900, ISO 400.

When I boarded the streetcar, I moved to the back of the car hoping to catch some shots as we left the platform, maybe including one of the volunteers out the window. The woman in this scene with the wonderful light on her face immediately caught my eye so I knew I wanted to place her in the foreground. The streetcar was very crowded and I was only able to get a few photos before we pulled out so instead of capturing her with the station in the background as originally intended, I caught the Hopscotch bridge and another photographer. I still like the photo.

Fujifilm X100S,f2.8 @ 1/900, ISO 400.

Fujifilm X100S,f2.8 @ 1/900, ISO 400.

As I returned to the Union Station stop after making a four-mile roundtrip I knew that I wanted to get at least one more shot; one that would connect the crowd to the streetcar while at the same time give a sense of the opening day ridership. I purposely focused on the streetcar and just let passengers walk by doing my best to frame the logo. In this photo, I like the boy on the right holding a hand and while I purposely tried not to show faces in this shot, the man looking down does help to draw attention to that gesture as well.

TIME TO REVISIT OVERLOOKED PHOTOGRAPHS

The final image of Mt. Denali edited in Adobe Lightroom CC and converted to black and white.

The final image of Mt. Denali edited in Adobe Lightroom CC and converted to black and white.

When I read the recent news about the name change of Mt. McKinley in Alaska to Mt. Denali, I remembered taking a photo through the window of a U.S. Coast Guard P-3 Orion late last year following an assignment in the Arctic.

After locating the photos on my hard drive, I quickly realized why I never bothered to process them at the time. They were bad. There was little color, no contrast, and very flat light. That was before I even bothered to notice all the dust spots. Nothing to get excited about here, right?

The original raw image seen at left was shot with a Nikon D3S and 24-70mm f2.8 lens zoomed to 70mm, at 1/400, f13 with an of ISO 250. Final image is at right.

The original raw image seen at left was shot with a Nikon D3S and 24-70mm f2.8 lens zoomed to 70mm, at 1/400, f13 with an of ISO 250. Final image is at right.

Still, I did shoot in Raw, so I really had nothing to lose by bringing the photos into Adobe Lightroom CC and seeing if anything could be done to rescue them. After a few minutes of editing, something wonderful began to appear.

I am continuously amazed by the power of image editing software, especially Lightroom CC. Not only is it powerful software, but it is really easy to use and incredibly intuitive. While I use Adobe Photoshop CC as well, I find myself using Lightroom more and more as my primary image editing choice.

Lightroom has a very good spot removal tool, but because of the amount of clean up needed in this photo, I switched to Photoshop and used a combination of the spot healing and clone stamp tools.

Lightroom has a very good spot removal tool, but because of the amount of clean up needed in this photo, I switched to Photoshop and used a combination of the spot healing and clone stamp tools.

However, when you combine the two programs then you have the ability to do some amazing things. Adobe realized this and now offers a photography plan where you get both programs for $9.99 a month.

Getting it right, or at least closer than I did with this photo, in camera is still the best thing you can do. But it also doesn't hurt to go back and see if you can turn those overlooked photos into something wonderful.

Online resources:

Lightroom Killer Tips

Adobe Photoshop Lightroom tutorials from novice to expert

MEMORIAL DAY - A PERFECT DAY FOR A PHOTO WALK IN DC

The Martin Luther King, Jr. Memorial is the newest addition to the National Mall in Washington, D.C.
I know it is not the final Monday in May. This is memorial day with a small "m."

It started as a government snow day and it doesn't take much in the Washington, D.C., area for the government to shutdown due to weather, or even the threat of weather.

On these days the temptation is to stay inside, pour a second cup of coffee and just spend the day relaxing. Of course the other option is to grab a camera and take advantage of the weather and day off to get some unique shots. On this day, and after a text from a friend reminding me I should be out shooting, I decided to head downtown.

The Vietnam Veterans Memorial was the final stop and by this time the sun started to come out and made for some interesting reflections in the still wet stone.
In the absence of a specific assignment, I like to pick a theme prior to heading out on a shoot. It doesn't mean I have to stick with the theme, but I find that it is helps to focus, otherwise I just walk around aimlessly with my camera and end up disappointed at the end of the day. So the natural theme I self assigned myself was to capture Washington, D.C., under a blanket of snow.

Now remember when I said earlier in this post that it doesn't take much for the government to shut down. Well this was the case and as I exited the metro at Foggy Bottom it was apparent that my theme was already melting away. There was NO snow.

The Lincoln Memorial was a good starting point.
With that idea out I decided to just start walking in the direction of the Lincoln Memorial and see what I could see and before I realized it, I found myself walking from memorial to memorial and it hit me, or more specifically a new theme came to light; memorial day. Not the most original theme of course, but if you are in Washington, D.C., you really are in the perfect place for this kind of photo walk.

Map shows the route I took to capture memorial photos in Washington, D.C.
The route I took from the Lincoln Memorial to the Vietnam Veterans Memorial.
I started at the Lincoln Memorial (A) and made a counter clockwise loop ending at the Vietnam Veterans Memorial (E). Along the way I stopped at the Korean War Memorial (B), Martin Luther King, Jr Memorial (C) and the World War II Memorial (D).

Snow was the most apparent at the Korean War Memorial and somehow the most appropriate.
There were very few people around and while I usually try and include people in my photographs, this day I concentrated more on the memorials themselves. I carried only my Fuji X100S and shot in black and white mode all day.

Even though there was no snow, or very little snow on the ground, everything was wet which made for some great reflections. Also as the day wore on, the sky cleared up and provided some nice light and cloud formations.

Just because the theme for the walk was memorial day, it doesn't mean other things won't catch your eye along the way.
Give yourself an assignment or pick a theme to get started and get out there and shoot. Don't wait for a rainy day. But if it is raining, or snowing, all the better.