Fuji

DID I FINALLY FIND THE PERFECT FUJI X LENS?

This was the first scene I came across as I found a position near 6th St. on the Mall. The Naked Cowboy is cliché, but that's in Times Square, not D.C. Plus who could pass up the word Trump emblazoned across his Fruit of the Loom underwear. Fujifilm X-Pro2 with a Fujinon XF 23mm f2 R WR, 1/90 @ f2.8, ISO 200.

It has been a little more than a year since I've been shooting with the Fujifilm X-Pro2. It has also been a year since I've been searching for the just the right lens to pair with this exceptional camera.

I originally purchased the Fujinon XF35mm F2 R WR lens and soon realized that I wanted something a little wider. Welcome to my next lens, the Fujinon XF16mm F1.4 R WR. The 16mm is a great lens, very sharp and I've used it many times, mostly while photographing landscapes. But, as I noted when I wrote about this lens, it is just too large and heavy to be my everyday lens.

When I went to the 2009 inauguration of Barack Obama I was about a block farther away, so I knew that I would never get a photograph of the actual swearing in. So I positioned myself close to a screen in order to capture the moment. Fujifilm X-Pro2 with a Fujinon XF 23mm f2 R WR, 1/320 @ f5.6, ISO 200.

Same thing for the Fujinon 16-55mm F2.8 R LM WR lens. Again a great lens, but also large and heavy. While I only borrowed this lens, I noted the good and bad when I wrote about it following a visit to Grand Central Terminal. The search continued for that perfect everyday carry-around lens.

Maybe you have guessed by now which lens I've finally chosen. In fact, it was a lens that I shot with for almost two years and loved, I just didn't realize it, or maybe I was in denial. Or maybe I'm just slow to catch on.

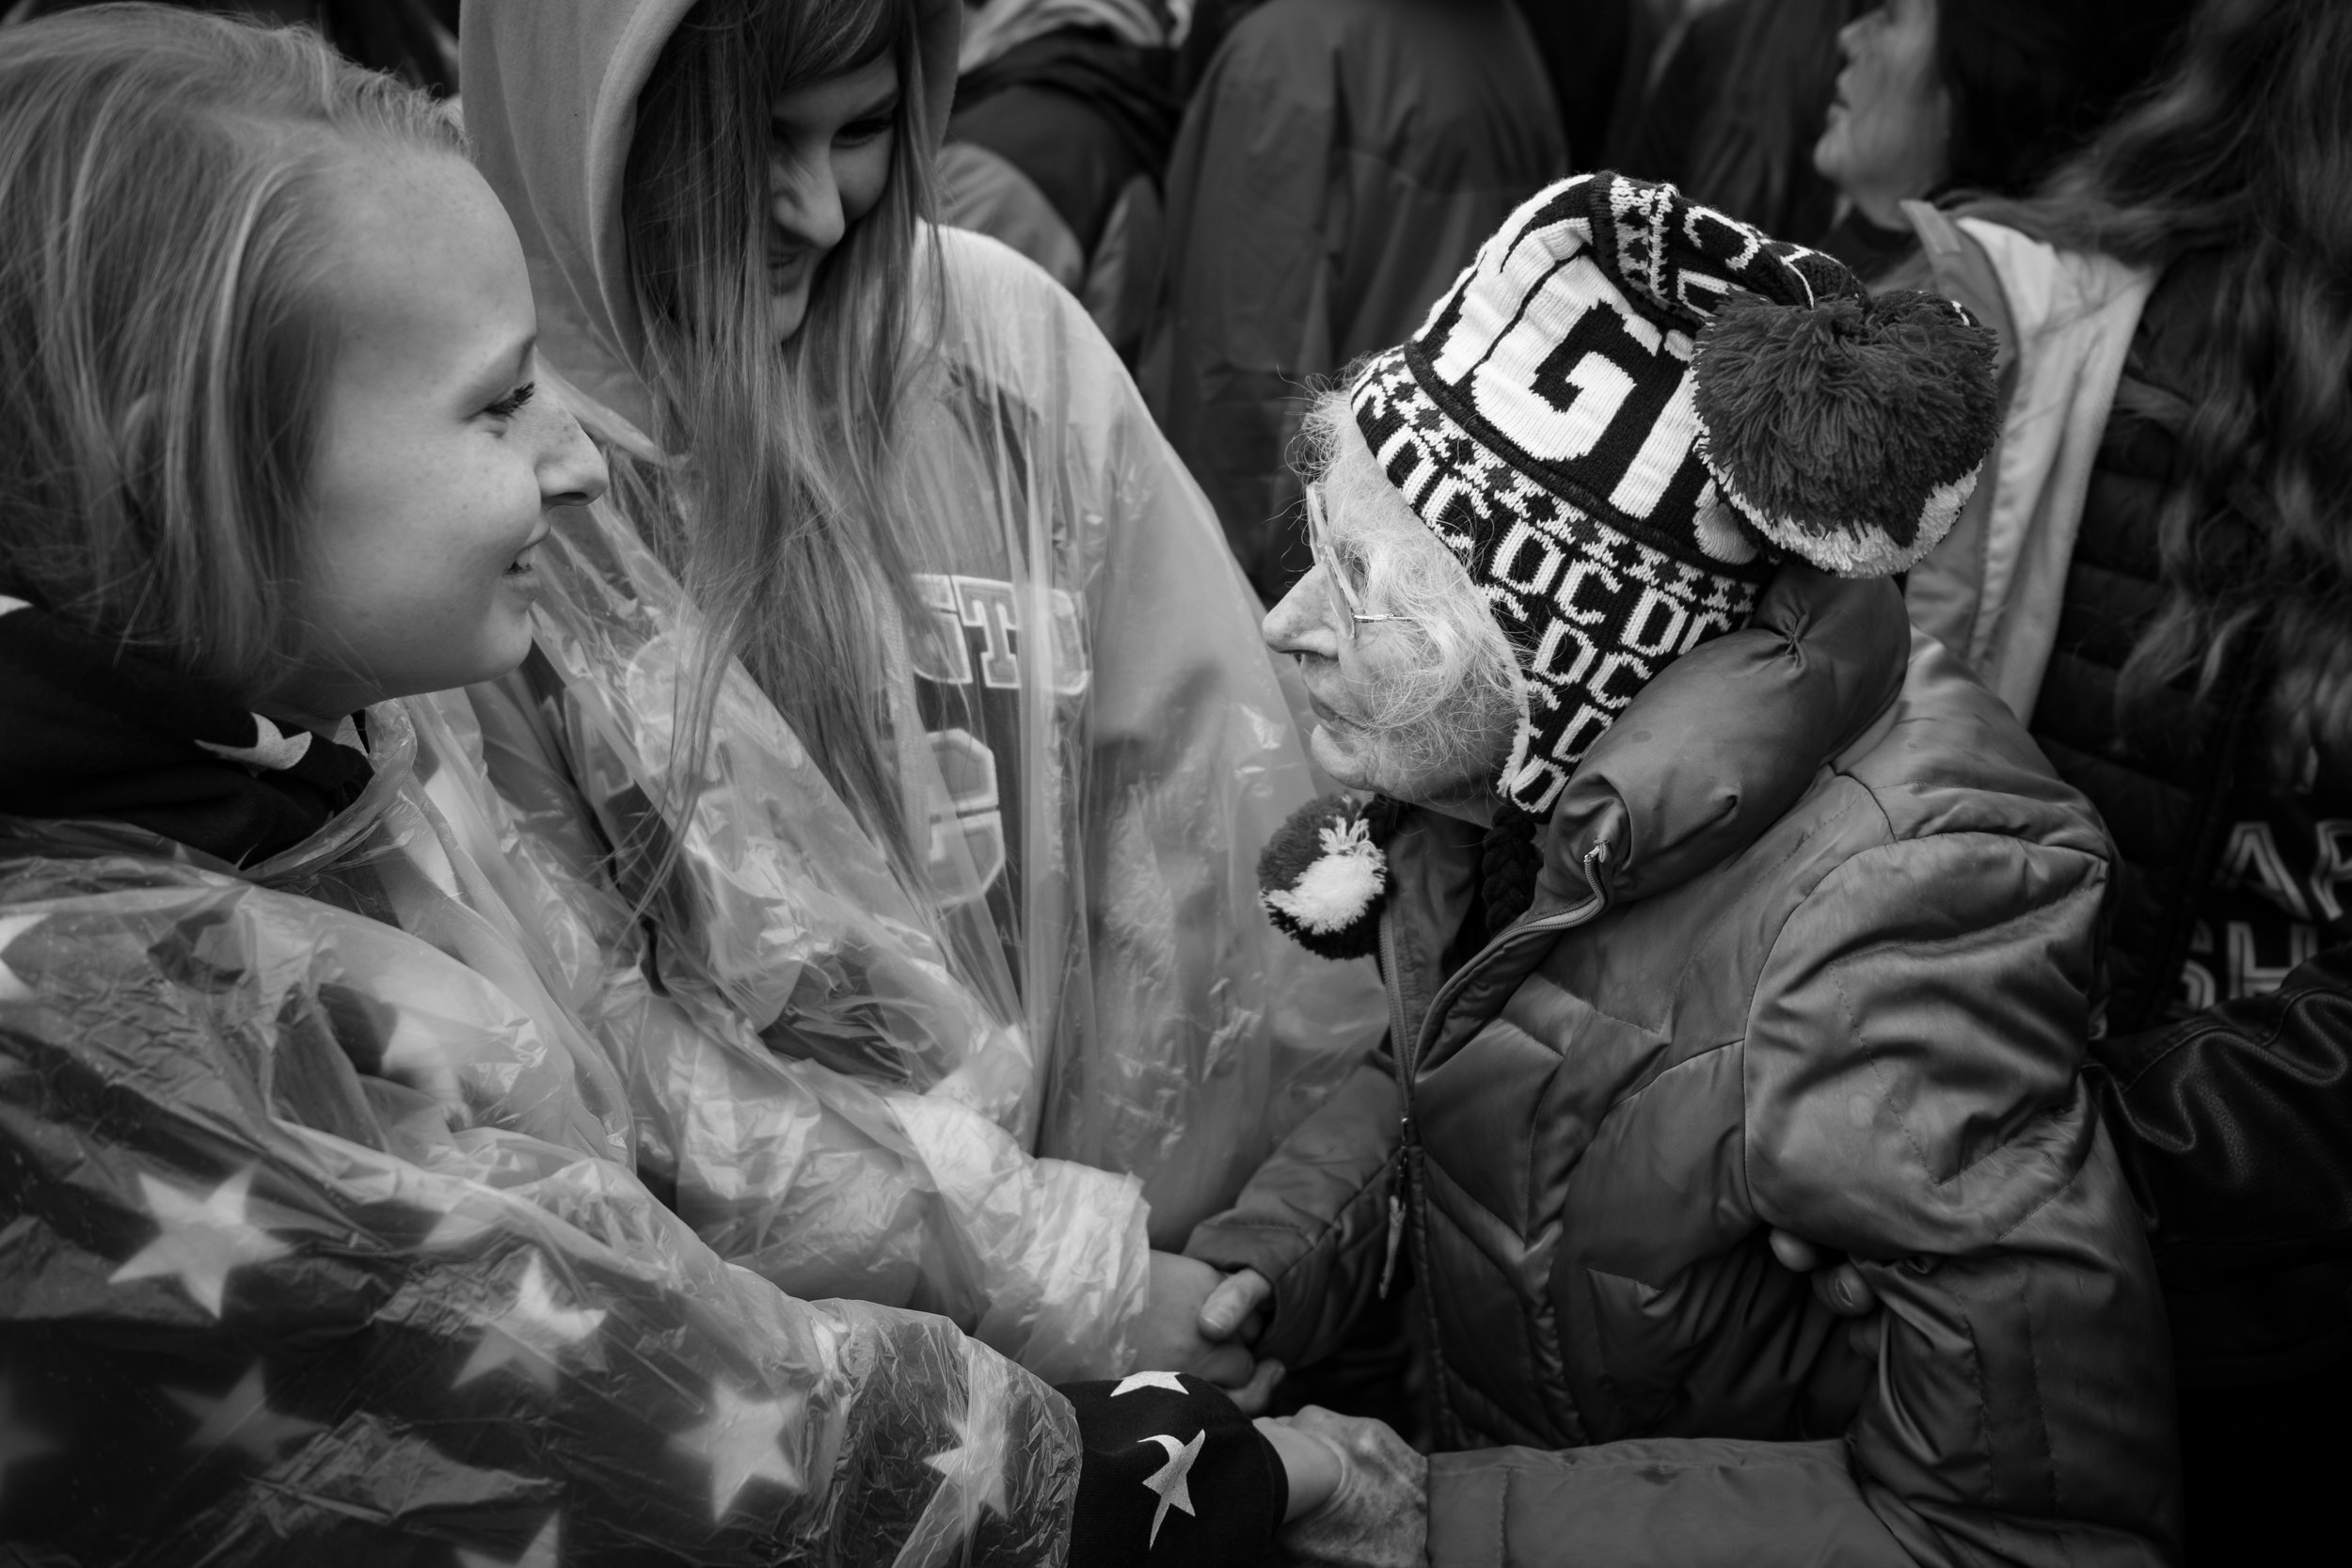
The 23mm allowed me to capture this moment between two first time inauguration attendees while moving in the crowds. Fujifilm X-Pro2 with a Fujinon XF 23mm f2 R WR, 1/300 @ f2.8, ISO 200.

Whatever the case, the lens, of course, is the Fujinon XF23 F2 R WR. For two years, I used that focal length on my Fujifilm X100S. Street photography, landscapes and everything in between, that was my go to lens. Of course, it was the only lens, since it is fixed on the X100S.

The point is that not given a choice, I found that the 23mm (35 equivalent) was the perfect lens. So for the past three weeks, starting with the inauguration, I've only used that lens and I've fallen in love all over again. It's small, light and seems to be the perfect focal length to capture both wide overall establishing shots and the up close and intimate shots.

The only negative, and it's the same negative that I had with the 16mm lens. Why can't Fuji just provide the right lens hood when I make the purchase? In both cases, I've purchased the upgraded lens hoods; the LH FX16 and the LH FX35-2.

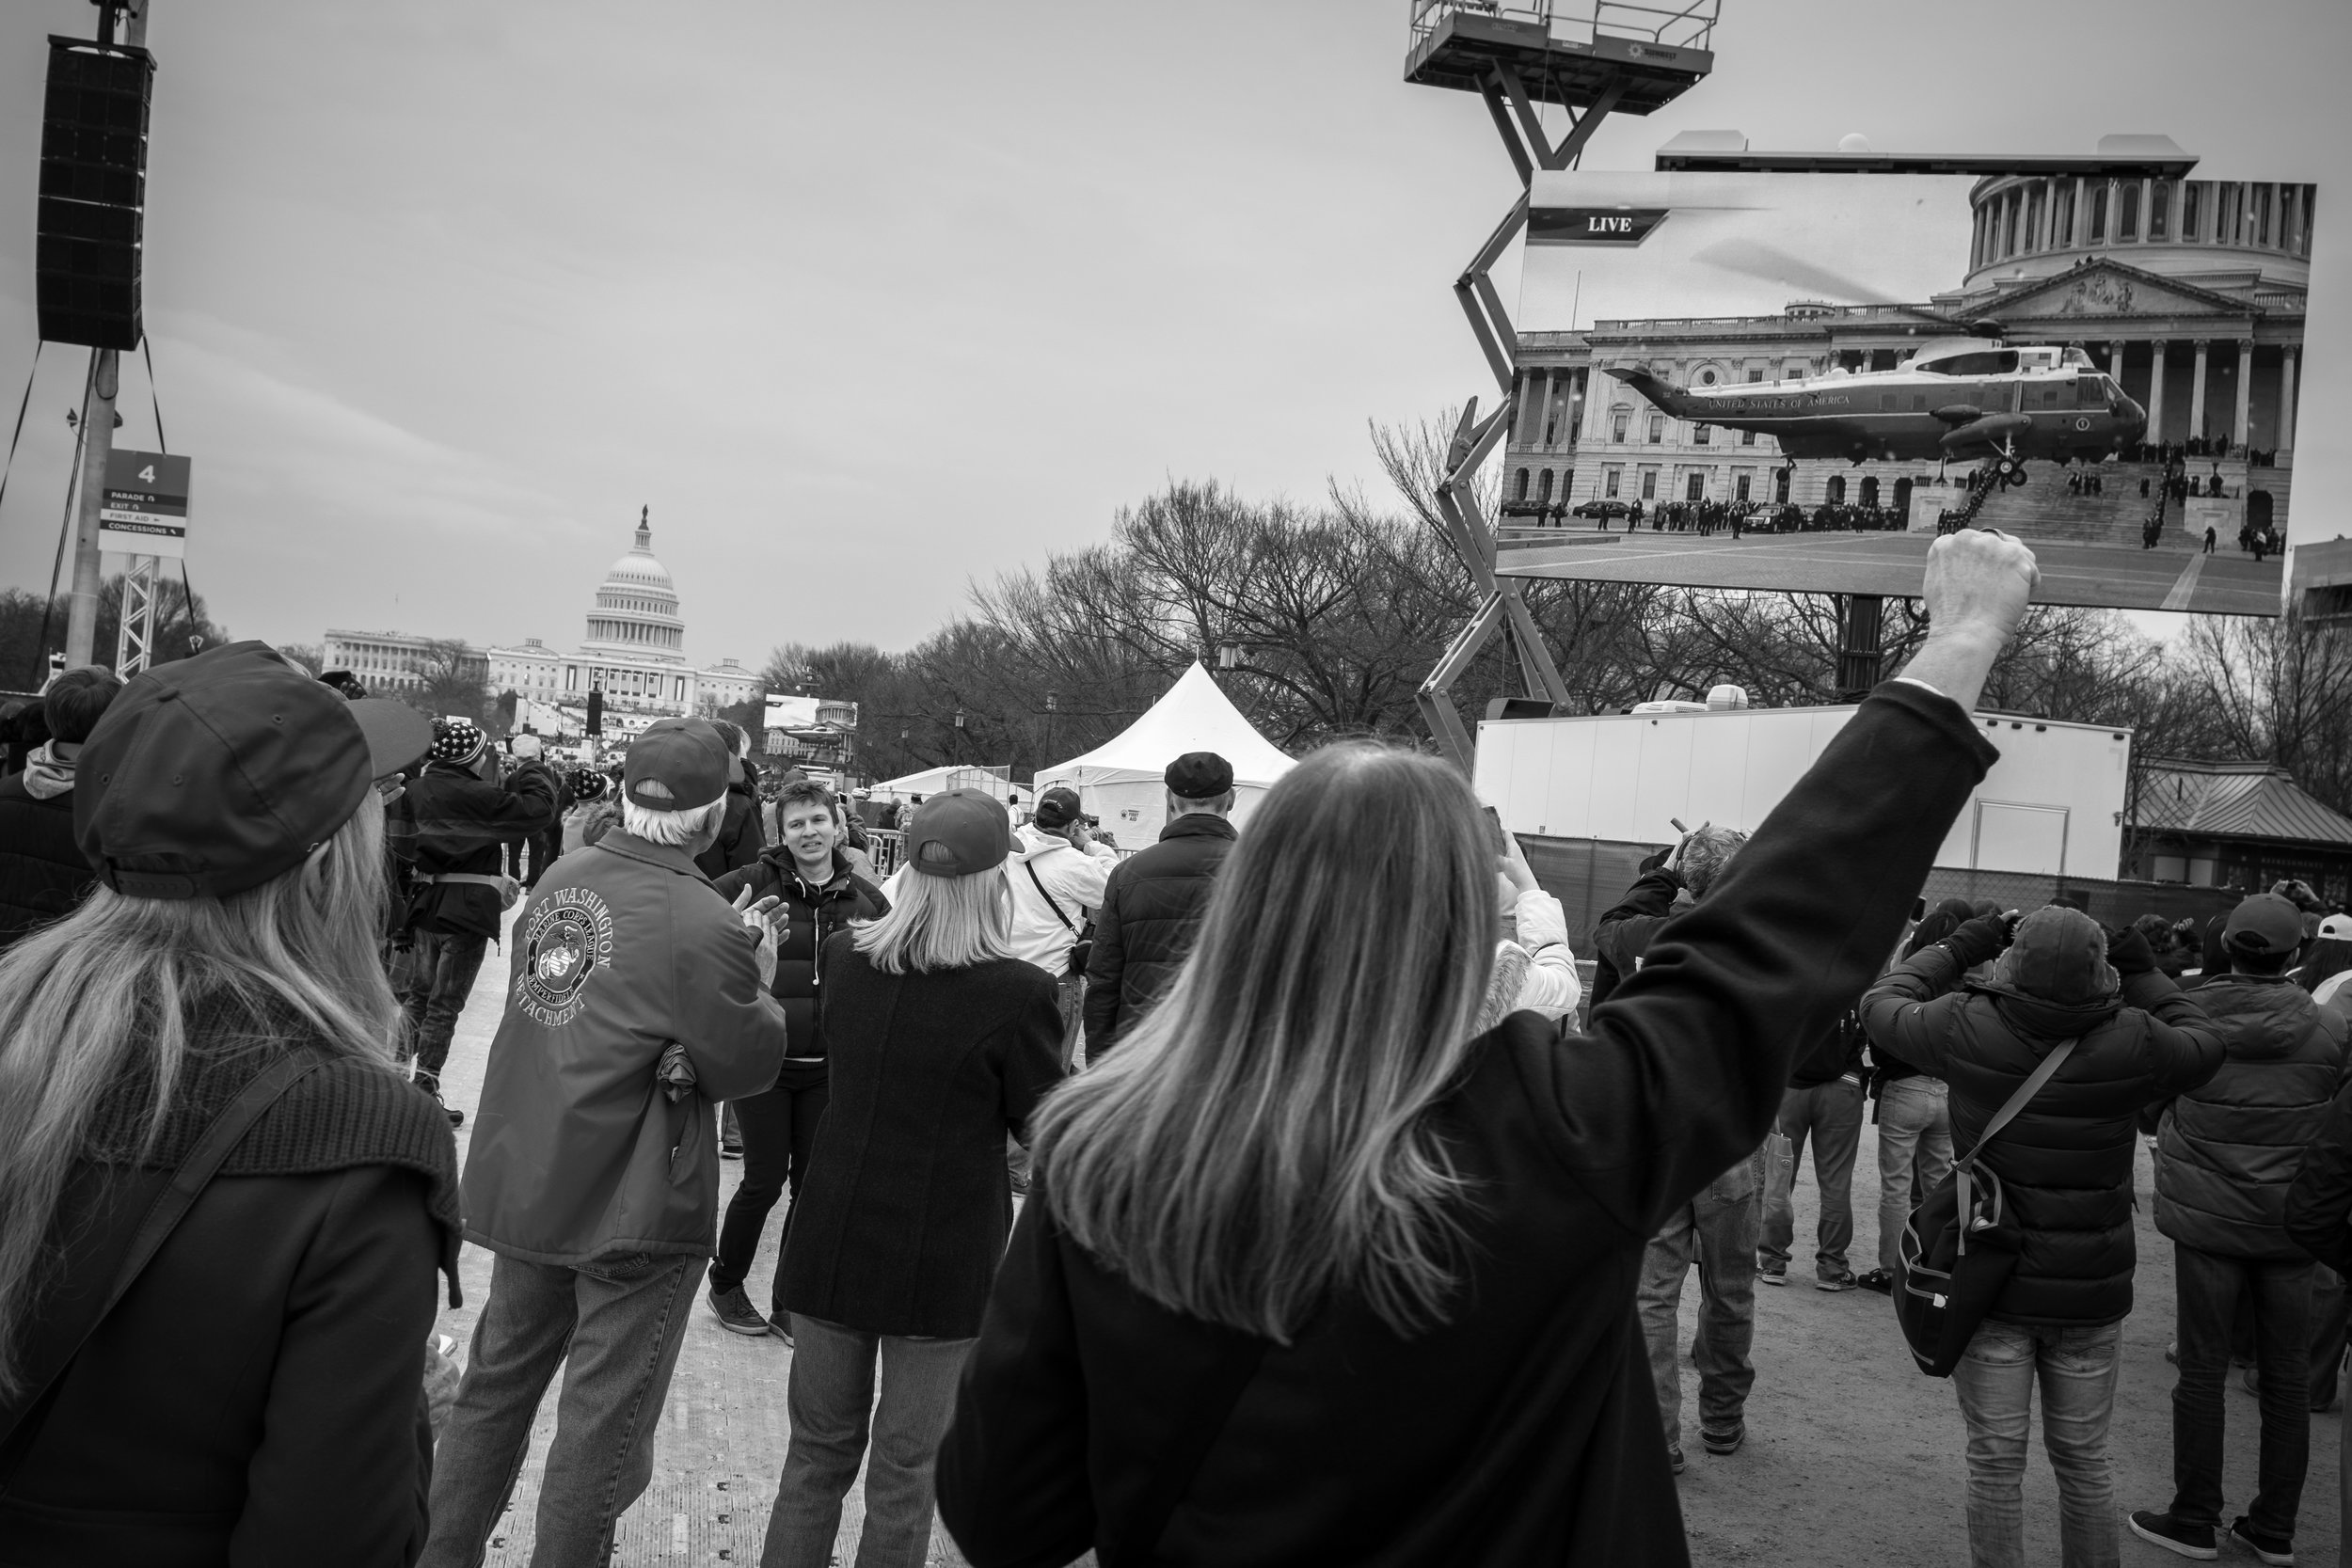
The final photograph I made that day was of Barack and Michelle Obama leaving D.C. aboard Marine One. Once again I was looking for crowd reaction to the scene happening on the big screen. Although there is some disagreement, my opinion is the crowds weren't as big as in 2009, but this is the kind of situation, crowds, fast-moving and with plenty of action, that I like, and the 23mm was the perfect one lens for me that day. Fujifilm X-Pro2 with a Fujinon XF 23mm f2 R WR, 1/200 @ f6.4, ISO 200.

These are pricey upgrades and cheaper options are available but don't be fooled. In the past, I've recommended some of the less expensive lens hoods, but for the 23mm, like the 16mm, these hoods are very different and while overpriced, are worth it. As a bonus, the LH FX35-2 will fit both the 35mm and 23mm lens. 

Lens hood issue aside, the 23mm is very sharp and in my opinion the best all around lens to pair with my X-Pro2 for a wide range of photography. The 16mm and 35mm are by no means obsolete but are no longer carried with me every day.

PHOTOGRAPHING THREE WATERFALLS IN THREE DAYS

A tripod of some sorts is a must if you wish to convey movement in the water. One of the advantages of tree cover and shadows is that you can normally achieve this look without adding neutral density filters to your camera. Fallingwater Cascades is a 1.7 loop hike located in the Jefferson National Forest off of the Blue Ridge Parkway. Fuji x-Pro2 with 16MM. 1/1.7 @ f16, ISO 200, -0.3 exposure compensation.

I didn't set out to photograph waterfalls. In fact, I don't even get that thrilled about photographing waterfalls. Especially when it's the middle of the day in the summer. However, there are some advantages.

1. Many waterfalls are only a short hike from the road.

2. Since much of the light doesn't reach them, shooting in the middle of the day is normally not a problem. 

3. People seem to like when you show them photographs of waterfalls. Translates to plenty of likes on social media.

Light not great, lots of people, that's when you look for other angles. I noticed these leaves and how the strong mid-day sun made them pop. That same light also provided a nice rim light which separated the rock ledge from the background and also reflected off the water brightening the underside which kept it from going completely dark. Spruce Flats Falls is a 1.5 mile out and back hike located near the Great Smoky Mountains Institute at Treemont. Fuji X-Pro2 with 35MM. 1/100 @ f2.2, ISO 200.

There are also some disadvantages to photographing waterfalls.

1. Many waterfalls are only a short hike from the road.

2. Since much of the light doesn't reach the waterfall, there can be a wide exposure range between the light that does reach them and the shadows.

3. People not only like to see photographs of waterfalls, they also like to visit them. This normally happens about the same time you decide to photograph them.

You will need patience if you hope to capture a waterfall without people. Or you could embrace it and use people to add a splash of color and additional movement in the frame. Grotto Falls is a 2.6 mile out and back hike located outside Gatlinburg, Tenn., in the Great Smoky Mountains. Fuji X-Pro2 with 16MM. 

I actually photographed more than the three waterfalls in the three days, but after a while, they do all start to look the same. 


HAWAII WITH THE FUJIFILM X-PRO2

On the first day as I wandered around Waikiki Beach trying to overcome some jet lag, I came across these kids being kids. I watched for a little bit before taking any photos and while they were aware I was there, they soon just went back to timing t…

On the first day as I wandered around Waikiki Beach trying to overcome some jet lag, I came across these kids being kids. I watched for a little bit before taking any photos and while they were aware I was there, they soon just went back to timing the surf and leaping from the pier. I liked this photo best because while most of these kids jumped feet first, this girl just went for it.  1/680 @ f5.6, ISO 200.

During a recent trip to Honolulu, Hawaii, I had my first chance to spend some time walking around with my new Fujifilm X-Pro2. In the previous post, I explained my initial camera setup and my thoughts behind those choices. In this post, I'll discuss whether I stuck with those choices and share a few things I learned.

The camera handled great, felt good to carry and performed up to my expectations. That really isn't a surprise, however, I was surprised by how much I liked it more than the X-Pro1. Granted, I only spent a week with the X-Pro1, but Fuji really did take the time to improve this camera versus the original. Little things, but well thought out.

As the sun dipped below the horizon, it didn't take long for it to get dark. I was photographing surfers and paddle boarders coming ashore when I noticed a hotel's flood light illuminating a patch of sand, so I positioned myself hoping that some act…

As the sun dipped below the horizon, it didn't take long for it to get dark. I was photographing surfers and paddle boarders coming ashore when I noticed a hotel's flood light illuminating a patch of sand, so I positioned myself hoping that some action would take place in or near the light. I like the warm yellow light contrasting with the blue ocean and sky and that last hint of pink. I think that just enough light reaches the subjects and ensures that they weren't in silhouette. 1/35 @ f2.0, ISO 3200. 

I stuck to shooting Auto ISO with my max ISO set to 3200. I was happy with the results, but I may up that to 6400. During this trip, I was working during the day (video project) so most of my personal shooting with the Fuji was during the evening hours where 3200 was fine, however on one occasion, I was shooting after the sun had set and in that case I could have used the faster shutter speed provided by setting the upper limit to 6400. 

I was around the fifth person to reach the top of Diamond Head just as the sun was coming up. In this photo, several visitors defied the off-limits signs and ventured about 50 yards to another peak. I didn't pay much attention until this gentle…

I was around the fifth person to reach the top of Diamond Head just as the sun was coming up. In this photo, several visitors defied the off-limits signs and ventured about 50 yards to another peak. I didn't pay much attention until this gentleman climbed atop the metal frame. I like the contrast between the grass, concrete and the performance of this man balancing atop some old metal. With Honolulu in the background, he's on top of the world. 1/75 @ f6.4, ISO 200.

I'm really glad I choose the 35mm f2.0 R WR lens. Unlike the 35mm f1.4, which I previously used with the X-Pro1, It is smaller, quieter and weather resistant, all things that came into play during this trip. Another thing that I appreciated about this lens is the focal length. At a 50mm equivalent, it has a nice reach, yet still works in close situations. I will probably still purchase something wider, but I'm not in any hurry.

Something else I realized was that within a half hour of me reaching the summit of Diamond Head, I was joined by the entire country of Japan. Seriously, it did get really crowded and most of the visitors continued to take photos of the rising sun, p…

Something else I realized was that within a half hour of me reaching the summit of Diamond Head, I was joined by the entire country of Japan. Seriously, it did get really crowded and most of the visitors continued to take photos of the rising sun, probably long after it made sense. But as I made my way back down, I wanted to take a photo that would give a sense of the crowd, when I spotted this woman taking a picture of the sunrise. I turned, made three frames and keep moving. 1/120 @ f6.4, ISO 200.

The autofocus was really quick and the added ability to move the focus area around quickly using the joystick was a welcome addition. In a few instances when shooting on the street, I reacted quickly and the focus was locked on without me having to think about it. Like all the previous mirrorless cameras I've used, you do have to make sure the camera "awake" or you could experience an initial delay.

On Oahu's North Shore, there are hundreds of spots to pull over and explore the coast with your camera. The weather was not great and most of the morning I was dealing with volcanic fog, or VOG, as the locals call it. Eventually, as I continued to d…

On Oahu's North Shore, there are hundreds of spots to pull over and explore the coast with your camera. The weather was not great and most of the morning I was dealing with volcanic fog, or VOG, as the locals call it. Eventually, as I continued to drive along the coast, this tidal pool caught my attention and I focused on the lone snorkeler and the range of subtle color changes throughout the scene. 1/680 @ f5.6, ISO 200.

I loaded the dual card slots with San Disk 32mb SDHC cards, capturing monochrome jpegs to one and raw files to the other. Not sold on this. I still really like seeing the results in monochrome as I shoot, but I also utilized the built-in WiFi a lot with this camera. It's how I transferred my photos to my phone and iPad then shared on social media during the trip. However, since I was caputing in monochrome, if I wanted to use a color version, I had to first do an in-camera raw conversion. Again, this is something I'm going to have to work on.

On my last night in Hawaii, I was walking back from dinner along Waikiki Beach watching all the tourists line up to photograph the sunset. It was a nice sunset, however with nothing spectacular to put in the foreground, I was drawn to the color refl…

On my last night in Hawaii, I was walking back from dinner along Waikiki Beach watching all the tourists line up to photograph the sunset. It was a nice sunset, however with nothing spectacular to put in the foreground, I was drawn to the color reflected in the receding waves. A different view of the setting sun. 1/40 @ f3.2, ISO 200.

There is no doubt the X-Pro2 is now my everyday carry-around camera. It handled well in all the shooting situations I found myself in and the 24 megapixels images are just beautiful. Off to Portland, Oregon, next week, so more to follow.


5 TIPS FOR PHOTOGRAPHING THE GOLDEN GATE BRIDGE

The Golden Gate Bridge a half hour prior to sunrise. 30 sec. @ f8, ISO 200.

The Golden Gate Bridge a half hour prior to sunrise. 30 sec. @ f8, ISO 200.

Before I get to my five tips, I will state right up front that much like my blog post,  Five Tips for Shooting Antelope Canyon, this was my first time photographing the Golden Gate Bridge. I say that only to admit that I'm not the expert and in fact, welcome comments, additional tips or even to tell me I'm wrong.

However, as a professional photographer, you might find it interesting how I approach a subject that I never photographed and only have a limited time to do so. In this case, I was in San Francisco for three days, but all of that time was not dedicated to taking pictures of possibly the most photographed bridge in the world. Also of note, all of the photos were taken with a Fujifilm X-T1 mirrorless camera that I had for review.

Consider a rental car or Zip car so you can get to locations away from the crowds, like this photograph of the bridge taken from Point Bonita Lighthouse just before sunset. 1/18 @ f22, ISO 200.

Consider a rental car or Zip car so you can get to locations away from the crowds, like this photograph of the bridge taken from Point Bonita Lighthouse just before sunset. 1/18 @ f22, ISO 200.

Also, while it is possible to get to the Golden Gate Bridge via public transportation, tour bus or even by bike, renting a car seems to be the easiest and most convenient way to get to many of the shooting locations, especially if you have limited time or want the ultimate flexibility to chase light.

1. Location, location, location.

There are numerous locations or vantage points to photograph the bridge and I'll cover just a few even though I'm sure locals have all kinds of hidden spots picked out.

I shot from three basic locations on the North side and two on the South or San Francisco side of the bridge. On the North, it was Vista Point, Battery Spencer, Marin Headlands (Hawk Hill) and on the South, Lands End, and the South Side parking lot.

Vista Point is the first exit after crossing the bridge heading north and while it offers an alright view of the bridge, my suggestion would be to skip the crowded parking lot and head down the hill towards the Coast Guard Station where you can view the bridge from a low angle. Then walk up to the Vista Point visitors center for an additional view.

A different look at the bridge from Battery Spencer. 1/1700 @ f3.2, ISO 400.

A different look at the bridge from Battery Spencer. 1/1700 @ f3.2, ISO 400.

After leaving Vista Point cross under the bridge and start the climb up Conzelman Rd. making Battery Spencer your first stop. This is a great location and it was the first place that I stopped to photograph the bridge. I was surprised how close the bridge was and you feel like you are at eye level with the bridge towers. Nice vantage point to shoot verticals too.

After leaving Battery Spencer, you continue to climb until you reach the highest point, Hawk Hill. From this vantage point, you get a great overview of the bridge with the city behind it. Don't forget to explore the old World War II batteries while you are there and if you continue on foot through former gun emplacement tunnels to the other side, you will have a bonus view of the Point Bonita Lighthouse.

There are several stopping points along the way so take your time and pull over every chance you get either on the way up or on the return trip, because the view is different and unique each time.

Screen shot from my iPad of the SunSeeker App showing my location and sun direction on the morning of March 17, 2015, as I was attempting to photograph the sunrise. One of the nice things about this App is that you can pick a day and time in the fut…

Screen shot from my iPad of the SunSeeker App showing my location and sun direction on the morning of March 17, 2015, as I was attempting to photograph the sunrise. One of the nice things about this App is that you can pick a day and time in the future so that there are no surprises, except for maybe rain and fog.

2. Timing is everything.

Make sure to leave yourself enough time and shooting days to capture the bridge during different times of the day. If you are planning to shoot sunrise or pre-sunrise from Hawk Hill, Conzelman Rd. is closed about a half mile from the top until after sunrise. There is a parking lot, so join the bicyclists and joggers as you make your way to the top. Not too bad, but don't be surprised as I was.

Once again, I used the Sunseeker App to determine sun direction which helps determine where I'm going to start and end my day. Knowing where the sun will be during certain times of the day can help you pre-visualize photographs as you drive around scouting locations.

The Vista Point visitor center gets crowded with both cars and people. I found most people moved on quickly so if you want a particular shot, just wait a few minutes. 1/100 @ f11, ISO 200.

The Vista Point visitor center gets crowded with both cars and people. I found most people moved on quickly so if you want a particular shot, just wait a few minutes. 1/100 @ f11, ISO 200.

3. Avoid the crowds.

It is clear that you are not the first person who has thought about photographing the Golden Gate Bridge, so be prepared for crowds, especially at the visitors centers. Sometimes you may also have to pass by a pull-over because it is full, but remember there will be another. It was my experience that if you have a little patience while people grab their selfies, they will move on allowing you to get your shot.

And as in most situations, you lessen your chance of running into crowds by getting there early and staying late. After all, isn't that the best time to shoot anyway? So take a break in the middle of the day and head over to Sausalito for some tacos and Mexican beer at the Salsalita Taco Shop while everyone else is fighting for a spot to photograph the bridge in the noon time sun.

Think about details and capturing pieces of the bridge, even from underneath. This was taken while walking from the Coast Guard station up the hill to the Vista Point parking area. 1/350 @ f9, ISO 200.

Think about details and capturing pieces of the bridge, even from underneath. This was taken while walking from the Coast Guard station up the hill to the Vista Point parking area. 1/350 @ f9, ISO 200.

4. Look for something different.

The temptation is to go wide and take in the entire bridge. That makes a nice shot and sets the stage, but don't forget about details. With a telephoto lens, you can pick out details from many of the shooting locations I mentioned previously, but there are also places to access the bridge from underneath. And while I didn't get the chance on this trip, you can also walk or bike across the bridge, which would certainly get you up close and personal.

Among the first photographs I took of the bridge, was as I made the short climb at Battery Spencer which puts you at eye level with the bridge towers and in this case almost in the clouds. 1/60 @ f10, ISO 400.

Among the first photographs I took of the bridge, was as I made the short climb at Battery Spencer which puts you at eye level with the bridge towers and in this case almost in the clouds. 1/60 @ f10, ISO 400.

5. Weather can be your friend.

I could state the obvious and just say that the weather, especially clouds and fog, are unpredictable in San Francisco, or I could tell you to embrace it and use it to your advantage. On my first day photographing the bridge, I could only make it half way up Conzelman Rd. before the visibility dropped to near zero. But those same clouds added something to my photos taken from Battery Spencer when they covered just the top of the bridge.

The point is, don't make a judgment from your hotel room downtown. Get out to the locations you scouted and see for yourself because you never know when the weather will change and maybe even change in such a way that takes your photograph from alright to awesome.

Photographed from the trail at Lands End. I rarely use presets, but something about this photograph reminded me of a classic postcard, so I added Yesteryear, and Rounded Corners White presets in Lightroom 5. 1/2000 @ f4, ISO 200.

Photographed from the trail at Lands End. I rarely use presets, but something about this photograph reminded me of a classic postcard, so I added Yesteryear, and Rounded Corners White presets in Lightroom 5. 1/2000 @ f4, ISO 200.

As I said at the beginning of this blog post, there are many more locations to explore and photograph the bridge such as Crissy Field, Fort Point, Point Cavallo, Baker Beach and many, many more. In fact, maybe three days is not enough time.

So make the trip, have fun, and when not photographing the bridge, there are all kinds of other wonderful locations around the city to photograph.

SEVEN DAYS WITH THE FUJI X-T1

The first place I headed after landing in San Francisco was the Golden Gate Bridge. 1/200 @ f9, ISO 200.

The first place I headed after landing in San Francisco was the Golden Gate Bridge. 1/200 @ f9, ISO 200.

I recently spent seven days in and around San Francisco, California, with the Fujifilm X-T1. The X-T1 is the fourth of the Fuji X cameras that I've had the chance to use, starting with the X-10 in 2012 and most recently the X-Pro1 during seven days in New York . Of course, my everyday carry camera continues to be the X100S.

Fujifilm X-T1 mirrorless digital camera. Photo courtesy of Fujifilm.com

Fujifilm X-T1 mirrorless digital camera. Photo courtesy of Fujifilm.com

As with the X-Pro1 and my first experience with the X100S, I rented the X-T1 along with the 18-55mm kit lens and a spare battery from Borrowlenses.com. Before a review camera arrives, I download the manual, then read and watch other reviews or tutorials in order to familiarize myself with all the features. Then once the camera arrives I check to make sure the firmware has been updated and in this case while the camera was up-to-date, I did have to update the lens.

I never really felt as comfortable doing street photography with this camera as I have with previous Fuji X rangefinders such as the X-Pro1 and the X100S. 1/15 @ f6.4, ISO 200.

I never really felt as comfortable doing street photography with this camera as I have with previous Fuji X rangefinders such as the X-Pro1 and the X100S. 1/15 @ f6.4, ISO 200.

Right out of the box I liked Fuji's attention to detail and style. The camera felt nice in my hands and the shutter speed, exposure compensation, and ISO dials were solid and easily accessible on top of the camera. In fact, once I went through the electronic menus and set up my preferences, I did not have to return to them for most shooting situations. Fuji really has this down and with the Q menu feature, which is now standard, your most used menu items are only one-click away, and if not, then you can customize them.

I found the 18-55mm lens very sharp at all focal lengths and appreciated the zoom, especially during this review period where I was covering a variety of scenes. 1/13 @ f4.5, ISO 200.

I found the 18-55mm lens very sharp at all focal lengths and appreciated the zoom, especially during this review period where I was covering a variety of scenes. 1/13 @ f4.5, ISO 200.

Three things I noticed right away that made this camera different from previous Fuji cameras I've reviewed. It is not a rangefinder, the SD card slot is separate from the battery chamber and there is a tiltable LCD screen. Two of these I really liked.

The rangefinder is what first attracted me to the Fuji cameras and it remains what I like best about my X100S. In the X100S and the X-Pro1 you have a choice between an Optical Viewfinder (OVF) and an Electronic Viewfinder (EVF), but with the X-T1 you only have the EVF. And while the EVF is good, using it all the time felt like I was missing something. a connection with my subjects. This was especially true when I was shooting in continuous focus mode and it never seemed to lock focus. When I took the photo and the preview would appear, the photo was sharp, but while framing shots the focus just never seemed to lock in, even with camera on a tripod.

Having a tiltable LCD screen meant that it was extremely easy to take this shot with the camera pointing straight up.

Having a tiltable LCD screen meant that it was extremely easy to take this shot with the camera pointing straight up.

I never gave tiltable LCD screens a second thought. In fact, when reading rumors of an X-Pro2 it always mentioned a tiltable screen and I would roll my eyes. However after using the tiltable screen on the X-T1, I think I'm a convert and found myself using it often. It saved me from laying on my stomach when shooting macro or low angles and seemed to be a wonderful option when shooting straight up.

Lastly, having the card slot separate from the battery compartment seems insignificant, but there were definitely times when it comes in handy. Such as when the camera was mounted on a tripod (or has the tripod plate attached) it is nice to still be able to access the camera card. Maybe it is just me, but I always seem to release the battery when what I really want to do is eject the camera card, and this eliminates any chances of that. Although I think the real reason Fuji did this was to accommodate the vertical battery grip which I'm sure also adds balance to the camera, especially with longer lenses attached.

Fujifilm XF 18-55mm f 2.8-4 R LM OIS zoom lens. Photo courtesy of www.bhphotovideo.com

Fujifilm XF 18-55mm f 2.8-4 R LM OIS zoom lens. Photo courtesy of www.bhphotovideo.com

During the review, I used the Fujinon XF18-55mm f 2.8-4.0 zoom lens "kit lens." A "kit lens" normally denotes an inexpensive starter lens that comes with a camera, but I found that this lens performed very well. I noticed good contrast and sharpness throughout the zoom range and nothing felt "cheap" about it. One feature I did miss was having the f-stops printed on the lens barrel. I typically shoot in aperture priority mode, so knowing what f-stop I'm at is critical to controlling my exposure. When walking around with my camera, I'm always checking my camera settings so that as light or situations change, I can make adjustments before I'm ready to shoot. With this lens, I had to bring the camera up to my eye and look into the viewfinder. A new Fujinon XF 16-55mm f2.8 lens is now available and would have been my choice if street, or low light photography was my goal. 

This camera does not have a built in ND filter like the X100S, so the slowest shutter speed I could get was 1/18 in this situation when I would have preferred something slower. 1/18 @ f22, ISO 200.

This camera does not have a built in ND filter like the X100S, so the slowest shutter speed I could get was 1/18 in this situation when I would have preferred something slower. 1/18 @ f22, ISO 200.

The 18-55mm lens has Optical Image Stabilization, which I left it on during the entire review period, so I don't have any examples of it turned off for comparison, however, looking at my photos now, even shots taken hand-held at fairly slow shutter speeds, they are sharp. A small lens shade is included, although I experienced considerable lens flare, even with the sun at 90 degrees. This is something I did not notice when using the XF 35 f 1.4 lens during my review of the X-Pro1.

One thing about carrying a mirrorless camera, I am much more likely to notice shots like this during lunch in Sausalito. 1/140 @ f5, ISO 400.

One thing about carrying a mirrorless camera, I am much more likely to notice shots like this during lunch in Sausalito. 1/140 @ f5, ISO 400.

I spent the majority of the seven days shooting landscape or outdoor scenes with the camera on a tripod which is very different than my previous reviews of the X-Pro1 and the X100S. So while that let me learn a few things about this camera, it really made me feel like I was missing what I really like about Fuji X cameras - street photography. The X100S and the X-Pro1 are naturals for street photography, but I just never got the same feel with this camera. For some reason, I also seemed to draw more attention to myself with this camera. The lens does stick out from the body which might be more intimidating, or I maybe I just didn't appear comfortable or casual while carrying it.

There is built-in WiFi that when paired with an IOS or Android device, lets you browse and transfer images or control the camera remotely. After some initial difficulty getting the camera to pair with my phone*, I found that it worked well. And it was useful to browse photos and transfer some for sharing on social media which I previously did using an Eyefi Mobi card. What I really would have found useful in this App, is to have the film simulation modes so I could process the photos without having to do it in-camera first.   

Like with previous cameras, I set the X-T1 to shoot Raw + JPEG with the JPEG set to MONOCHROME + Ye filter. With the Firmware V3.00 update, you will be able to enable the classic chrome film simulation mode. 1/600 @ f7.1, ISO 400.

Like with previous cameras, I set the X-T1 to shoot Raw + JPEG with the JPEG set to MONOCHROME + Ye filter. With the Firmware V3.00 update, you will be able to enable the classic chrome film simulation mode. 1/600 @ f7.1, ISO 400.

Final thoughts. This is another nice camera from Fuji and I would have no problem recommending it to someone as their primary camera, even to someone considering going pro. If, however, you already own a DSLR and are looking for a second camera to carry around every day or when working the streets, then I would stick with the X100S or the new X100T.

But you know what I really want is an update to the X-Pro1. An updated rangefinder with interchangeable lenses. Now that's what will get me to spend my money.

*I originally downloaded the wrong App, which wasn't very clear in the Play Store. And based on the one-star reviews, I don't think I was the only person making this mistake.