AN ORIGINAL POLAROID SX-70 REBORN

Some of my earliest photographic memories are of my grandparents documenting holidays, vacations, and other events with a Polaroid camera. It was usually my grandmother who was behind the Polaroid, while my grandfather wielded the 8mm movie camera, blinding us with light as we entered their house.

In 1947 Polaroid introduced the Land Camera Model 95. This camera and subsequent models required that the photographic paper be removed manually, peeled open after 60 seconds, and then left to dry. This was often a messy process, but still it provided an instant memory. The SX-70 Land Camera, introduced in 1972, ejected it’s film automatically without chemical residue.

My grandparents Polaroid SX-70 Land Camera Alpha SE probably dates from 1976 and originally cost around $180.00, with film costing $6.90 for ten pictures. No small investment. In today’s dollars that’s $859.00 and $32.00 respectively. But the memories created by that camera, and my grandparents using it, are priceless.

Just some of the 30-year-old film packs that were stored with the camera. No surprise this film did not work.

While preparing for a move, I came across a bag containing that camera and several packs of film. I remembered taking the camera and film from my grandmothers house years before as a curiosity and to see if I could get it to work, but mostly for nostalgic reasons. Moving forced me to rid myself of many things, so if I was going to take this camera with me, it had to be for a reason, I had to see if it would work.

The first thing I tried was the obvious, take a pack of the old film and load it into the camera. It didn’t work. SX-70 Polaroid cameras get the six-volts they need to power the electronics and drive the motor from a PolaPulse cell inside the film pack, so it’s no wonder that the 30-year-old film pack had a dead battery. I ordered a new pack of Polaroid Originals 4676 Color Film from Amazon.

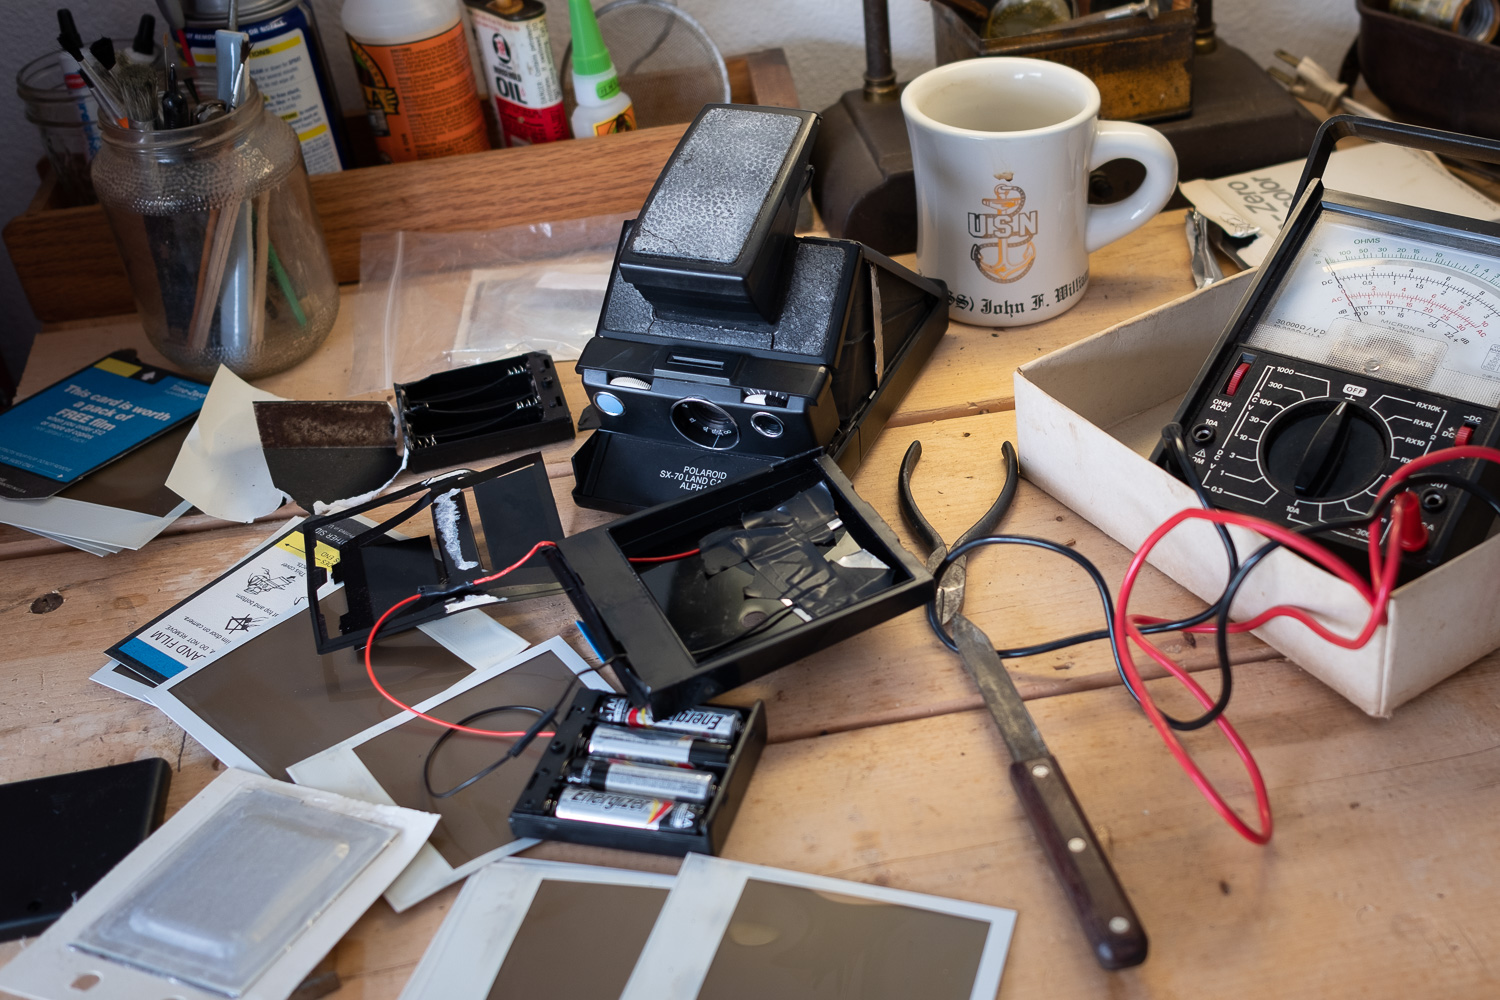
I used a 6v battery pack, some metal snipped from a piece of flashing, electrical tape, solder, and an empty film pack to build a Polaroid camera tester.

While doing background research on the camera I came across a few YouTube videos showing several ways to test polaroid cameras by applying external power. In order to do that, I purchased a 1.5v AA battery case holder for $5.89 and figured I had nothing to lose by trying it.

After several attempts which I show on my VLOG, I got the camera’s motorized drive to cycle. That, at least told me the camera was capable of working. Knowing this, I loaded it with that fresh pack of film and lo and behold, it worked. I was ready to take some photos.

This is the first photo taken with my grandparent’s SX-70 in over 35 years.

One thing I didn’t do prior to loading the new film pack, was clean any part of the camera. Therefore, the resulting photos have some streaks that may have been caused by dirty output rollers or possibly a small light leak. Or maybe it was me who didn’t realize you no longer need to bend or shake the photo and it is best if you shield them from light and place face down while they develop. Whatever the results though, for now I’m having some fun with this camera.

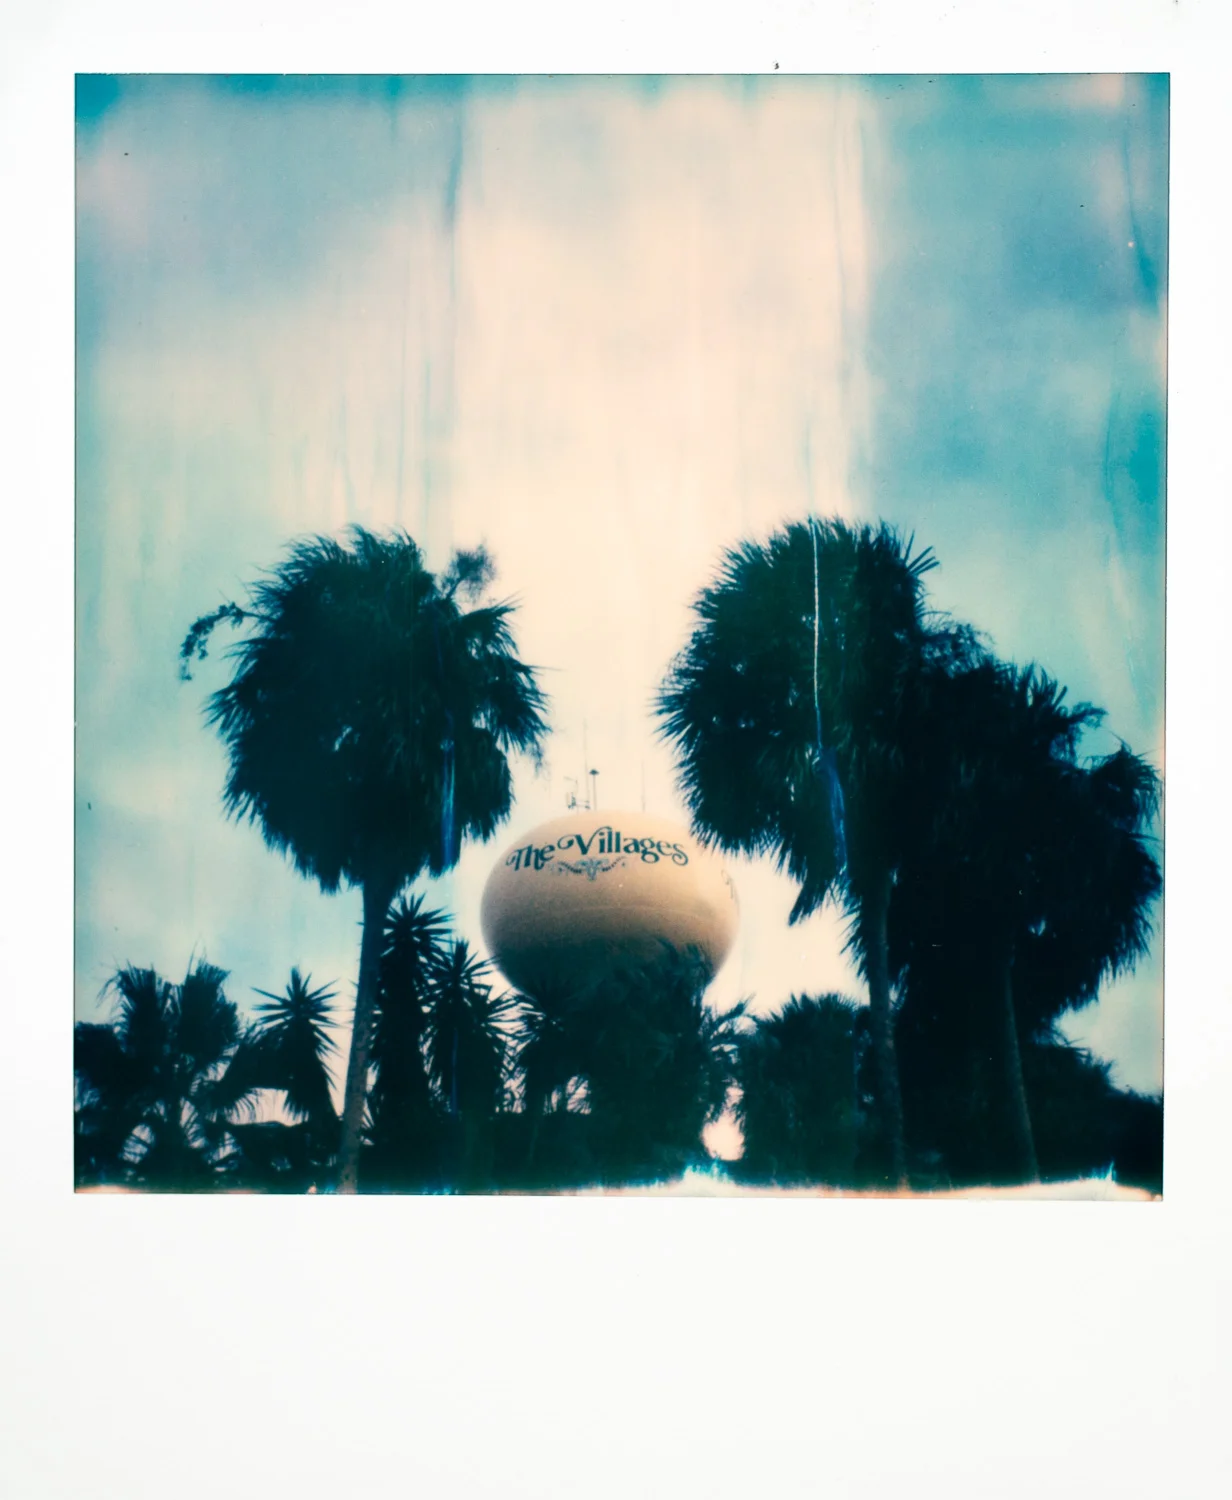
#Nofilter or post production needed to obtain the “Polaroid” look.

I love digital photography. I love the instant feedback you get after taking a picture and the ability to share that photo widely is exciting. You can even obtain that “Polaroid” look in post production. And I’m intrigued by the Fujifilm Instax Mini 90 or the Mini 9. And more than once I’ve almost ordered the Fujifilm Instax SP-3 Mobile Printer or it’s predecessor, the SP-2, to go with my Fujifilm X-PRO2. But for some reason, I didn’t or haven’t.

But, there really is no substitute for the original. No filters needed. No digital anything. There is something truly unique about shooting with a 35-year-old camera and then holding a fully developed print in your hand minutes later. Edwin H. Land knew this in 1947 and I know it today.

From my VLOG.


A BRIEF ENCOUNTER WITH THE NIKON Z7 MIRRORLESS CAMERA

The Nikon Z7 with new 24-70mm f4.0 at District Camera launch event in Washington, D.C.

I wasn’t that excited when I first heard that Nikon was entering the mirrorless camera space. I was curious, for sure, but just wasn’t expecting too much.

I was disappointed before. Remember the Nikon 1 J1? Or, maybe the Coolpix? Decent cameras, however, I kept waiting for Nikon to release a small form factor camera that was capable of meeting my needs. Over the years I’ve watched as Sony, Fuji, Olympus, and Panasonic all released mirrorless cameras. Mirrorless cameras capable of providing professional results.

Finally, after giving up on a Nikon mirrorless, I purchased the Fujifilm X100S, followed by the Fujifilm X-Pro2, and have never looked back. I’ve written often about Fujifilm cameras on this Blog and provided many reasons why I love both the X100S and the X-Pro2.

However, to be fair, in my professional life, I never gave up on Nikon and currently shoot with a couple of Nikon D4Ss and all the associated pro lenses. As much as I loved my Fujifilm cameras for my personal photography, I was never comfortable enough to consider replacing the Nikon DSLRs at work.

When I was invited to a Nikon Z7 launch dealer event at District Camera in Washington, D.C., through Nikon Professional Services, I knew it was time to take a look. I have been watching and reading all the reviews following Nikon’s announcement a couple of week’s back and this would figured it would be foolish to pass on the chance to get a first-hand look.

Cutting to the chase, I think Nikon finally got it right. Even though I was only able to handle the camera for about a half hour, and not allowed to use my own XQD card (I tried), what I was able to see, amazed me. More importantly, I could instantly start to see how this camera would fit nicely into my existing system and production schedule.

I was not able to use my own XQD card or take any images with me to process, so I used my phone to photograph the display, left, and then I double-tapped the screen to zoom in.

The electronic viewfinder is bright, the touch-screen display is large and responsive, the buttons and menus are all familiar to Nikon users, and the 24-70mm f4.0 lens was tact sharp. This camera also feels right in the hand thanks to a great design and a nice beefy grip. But, what really impressed me, and probably sold me, was the FTZ adaptor which allows the seamless connection of existing F-mount lenses to the Z-mount on the body. That’s what would make it fit instantly into my workflow.

For years now I have been trying to find smaller and lighter equipment in an effort to make travel easier and take some strain off of my aging body. I just couldn’t compromise the end product, either with video or stills. With the Nikon Z7, I don’t think I have to.

FUJINON LENS DILEMMA, OR PROBLEM, OR...

From left: The Fujinon 16mm, f1.4; 50mm, f2.0; 35mm, f2.0; 23mm, f2.0; and 18mm, f2.0.

I'm not sure how it happened. Of course, it started with one lens, the Fujinon 35mm lens which I purchased at the same time as my Fujifilm X-Pro2 camera. Then the desire to go wider, combined with a rebate, led me to purchase the Fujinon 16mm lens. Somewhere along the way I became aware of the Fujinon 23mm lens, followed closely by the Fujinon 50mm lens.

Now I've acquired the Fujinon 18mm lens. That's when I realized I might have a problem. Or more accurately, a dilemma. Even before this recent acquisition, I was looking to pare down my lens lineup. But which one would go. I was leaning towards the 35mm, however, with the addition of the 18mm, does that mean the 23mm is the logical choice to go? 

The Fujifilm 50mm, 35mm and 23mm lenses are all f2.0 and are sometimes referred to as Fujicrons, a nod to Leica's Summicron lenses which also have an f2.0 aperture. I've also referred these three lenses as the trifecta.

But the 23mm, along with the 35mm and 50mm make up what some call the "Fujicron" lineup, a nod to Leica's Summicron lenses. In this case, the Fujicron lenses are all sharp, lightweight, sturdy and do provide an acceptable range of coverage. I also previously wrote about how the Fujinon 23mm was possibly the perfect X lens, or how the 50mm completed my kit

Before I go any further, I should mention that I've decided the 16mm will stay. I've written about it before and while it is a bit heavy and large for everyday carry, it is absolutely my go-to lens for landscape photography.

Table and Chairs, Memphis, Tenn., 2018. Fujifilm X-Pro 2 with Fujinon 18mm lens, 1/125 @ f5.6, ISO 200.

So, what about the 18mm? I love the compact size and it's the first Fuji lens I've purchased that came with a usable lens shade out of the box. On the negative side, it's a noisy lens and a bit slow when focusing as compared to my other Fuji lenses. It also doesn't have the same build feel of the other Fuji lenses, yet it doesn't feel cheap either. Obviously, I need to shoot more with this lens before I make a final decision.

If you're reading this and have an opinion, I'd love to hear it in the comments. And if you haven't realized it yet, I probably won't part with any of these lenses. What's the point? Unless, of course, another lens catches my eye.

NOT A LAUGHING MATTER - PHOTOGRAPHING REMOTE LOCATIONS

If I was going to be stuck in a snowbank, it might as well have been with this view.

It was two pine trees that first caught my eye. Two trees out of thousands, with snow-capped mountains in the distance. This was going to be the first photograph I made after entering Denali National Park in Alaska. I didn't realize it would also be the last photograph of the trip.

I suppose before I go any further I should say that I wasn't seriously hurt when my leg broke through the snow and it dropped two and a half feet, although it was serious enough that I did visit urgent care the next day. I want to also say that at the time it was a laughing matter and I'm thankful that a co-worker who joined me during my scouting trip had the presence of mind to capture some photos on her cell phone.

However, that I had someone with me at all, was a rarity and why I've decided to write this post. I've written often about how when I get an opportunity to travel to a great location, I always try and build in extra days so that I can explore the area fully and make some personal photographs.

I was laughing at the absurdity of being stuck in a snow bank only three feet from the road and ten feet from my car.

That was the case on this assignment to photograph the Department of the Navy's Historically Black Colleges and Universities/Minority Institution program office's historic visit to the University of Alaska Fairbanks. When the assignment came in, I was determined that when it was over, I would visit Denali National Park, only 124 miles south. During a previous visit to Fairbanks* to photograph research on marginal ice zones over the Arctic Circle, my plans to visit Denali were changed when the C-130 aircraft I was in was diverted to Kodiak** on the last day. So this trip was finally going to give me that chance.

But this isn't a blog about making epic photographs, it's about how in almost all cases during these trips, I'm alone. Whether it is photographing the coastline in Oregon following an assignment in Portland, or climbing giant rocks in Joshua Tree National Park after several days filming at Camp Pendleton, I've never given much thought to the fact that I'm by myself in these remote locations. Often scrambling down steep embankments or climbing trails and crossing streams, in the dark, just to capture the sunrise.

To be safe and satisfy friends and loved ones, I visited urgent care Saturday morning for an x-ray on my lower leg. Results showed no break.

Injuring my leg has me thinking differently about the risks I've taken in the past. My original plan for the weekend was to borrow some snowshoes at the visitors center and do a series of short hikes. This trip was a chance to become familiar with the park and plan out those weekend hikes.

Even though it was late April, the trails and much of the park was still covered in snow. I could see this, yet still, I was only one step off the road when I broke through the snow. It happened quick.

Getting to a place in order to make great landscape photographs often means visiting remote locations. Getting off the beaten path. And I know we don't live in bubbles that involve no risk, but that doesn't mean we shouldn't take precautions. Below are just a few I'm thinking about.

The only positive thing about not being able to return to Denali over the weekend was that it gave me more time to visit some of the outstanding breweries in Fairbanks, like HooDoo.

1. Always let someone know where you will be. Better yet, let multiple people know. The hotel desk clerk, the park ranger at the visitor center and even friends and family members back home. Set a time you will make contact so that if they don't hear from you, they can alert authorities. If available, sign in (and out) of the trail log.

2. Be aware of the risks involved and understand your limits. It should go without saying that no photograph is worth risking serious injury. The older I get, the less risk I take, but I also have to understand that I can't do everything I used to do.

I'm putting on a good face even though my leg was killing me. Thank you to Sophoria for both capturing the photos of me in the snow, but also for being another voice of reason, urging me to visit urgent care, and checking in on me before catching her flight home that night.

3. Don't be afraid to ask others to join you. It can be difficult for non-photographers and photographers to travel together, but having someone along to share the experience or offer a different perspective can enhance the experience. And if you are lucky, they will also understand why you need to stay in one location for an hour waiting for the light to change.

Luckily this story ended well even if I didn't get any photographs from Denali. I'll be back and next time, I'll be sure to play it safe.

*On my last visit to Fairbanks I didn't make it to Denali, but I did capture the Northern Lights.

**And on that diverted flight to Kodiak, I was treated to an aerial view of what was then called Mt McKinley, now Mt. Denali.

PHOTOGRAPHING CHERRY BLOSSOMS PAST PEAK BLOOM

A lot of patience and a lot of exposures let me keep the branch in focus while still capturing plenty of motion in the cherry blossoms. Fujifilm X-Pro2, 50mm, 1/15 @ f16, ISO 100.

Every year I try to make it to downtown Washington, D.C., at least once to photograph the cherry blossoms. Sometimes my schedule aligns with peak bloom, which historically occurs between late March and early April, other years, I simply make the trip with no expectations other than fresh air and exercise.

This year one thing was for certain, the first weekend I was free was already past peak bloom, defined as the day 70 percent of the trees have opened their buds. The other thing about the day I choose to photograph was the weather, overcast with intermittent light rain and low temperatures. The day before, however, was perfect. So it goes and as it turned out, the weather worked to my advantage. 

Again, knowing that it was well past peak bloom, I was pretty much expecting that the blossoms would be on the ground and figured that would be the picture I came away with. What surprised me right away was the number of blossoms that were floating on the surface of the water in the tidal basin.

For this photo I choose a slightly slower shutter speed, coupled with a wider lens, to really emphasize the motion. Again, I left some branches in the frame to give context to the photograph. Fujifilm X-Pro2, 23mm, 1/8 @ f16, ISO 100

That was something I had not seen before and I knew right away that this was going to be the photograph. I had a tripod with me, which would allow me to shoot at slower shutter speeds, so It was only a matter of choosing the right shutter speed in order to show motion yet retain enough detail in the cherry blossoms. Too fast of a shutter and I would freeze the blossoms, too slow, and they would be a blur of pink. 

Even with overcast skies, I knew if I wanted a slower shutter speed, I was going to be right at the limits of my exposure. I stopped my lens all the way down to f16 and set my ISO to 100. That gave me a shutter speed of 1/8th to 1/15th, which I found to be the sweet spot. It's a good thing too, because without a neutral density filter that was it. 

This was the photograph I was expecting to make when I left the house that morning. Fujifilm X-Pro2, 50mm, 1/8 @ f10, ISO 200

Sometimes you head out for the day with the intention of making one set of photos and something entirely different presents itself. That was the case on this day and I couldn't be happier with the results.