Photography Tips

5 TIPS FOR PHOTOGRAPHING IN CADES COVE

An hour after sunrise, the first light reaches the valley and washes across Sparks Lane. Fujifilm X-Pro2, 50mm, 1/60 @ f11, ISO 200.

Cades Cove is located within the Great Smoky Mountains National Park. And if the Great Smoky Mountains National Park is the most visited national park in the United States, then Cades Cove is the most visited section of the most visited national park in the United States.

And for good reason. Located 27 miles from Gatlinburg or just nine miles from Townsend, Tenn., Cades Cove offers something for every photographer: wildlife, landscapes, waterfalls and historic structures.

So whether you plan to spend one day or five days exploring Cades Cove, these five tips will help to make the experience a joy rather than a frustration.

1. Patience. Cades Cove is circled by an 11-mile one-way paved road with a 20 mph posted speed limit, which means that even with no other cars it would take you 33 minutes to complete the loop. This will never happen. Give yourself plenty of time and trust me if you are a photographer, you must. Plan for at least two to four hours making the loop, especially considering you will want to make frequent stops to take in the scenery and wildlife.  

Also note that late October, early November for the fall colors and spring for the wildflowers are the busiest times to visit, along with almost all weekends.

As the sun rises in Cades Cove, it falls first on the tops of the surrounding mountains. In this photograph, the sun lights the fall foliage on the side of the mountain in the background. Fujifilm X-Pro2, 50mm, 1/30 @ f11, ISO 200.

2. Arrive early. The loop road will not open to automobiles until sunrise and the queue begins at least an hour before that. I recommend you join them, bring coffee and breakfast and refer to tip number one. Use this time to go over your gear and make sure you are ready to start taking pictures the moment you arrive at your first location because the sun will be rising fast.

On Wednesday and Saturday mornings from early May until late September prior to 10 a.m., the park is only open to bicycles and foot traffic. This is a great option to consider if the thought of traffic is already causing you stress.

In this early morning photograph taken on Hyatt Lane, I was able to get a few shots without cars in the scene. What you don't see are the two cars and a van loaded with photographers behind me. Fujifilm X-Pro2, 16mm, 1/15 @ f10, ISO 200.

3. Take a shortcut. There are two roads that cut across the center of Cades Cove, Sparks Lane and Hyatt Lane. Both are two-way, so they offer the option to cut your visit short or return back to the loop road from the direction you came. They are also great places to photograph, especially during early morning or late afternoon. One thing that will surely test your patience, is getting to your first shooting location quickly after the ranger opens the gate. While you have some leeway because the sun will take a little bit to rise above the mountains, you still want to be in place early.

So while non-photographers will normally concentrate on traveling around the loop, I suggest making the first left onto Sparks Lane shortly after entering Cades Cove and setting up to capture the sunrise. You will most likely be among the first ones there, or at a minimum, joined by other photographers. Park in the small area to your left just after you cross the creek and then explore the lane on foot.

The Eligah Oliver Place is just one of over a dozen historic structures located either close to the road or a short hike away. Fujifilm X-Pro2, 50mm, 1/500 @ f8, ISO 200.

4. Take your time. Spend the whole day or spend half a day, but don't rush your visit. Give yourself time to explore and after you've taken that sunrise or first light photograph, visit the restored cabins, barns, or churches. Take a hike, leave the paved road, venture into the woods. Look for locations that you want to return to later that day or the next day. Just remember to pack a lunch, bring water, a bag chair, whatever will make your day more comfortable and ease the temptation to rush.

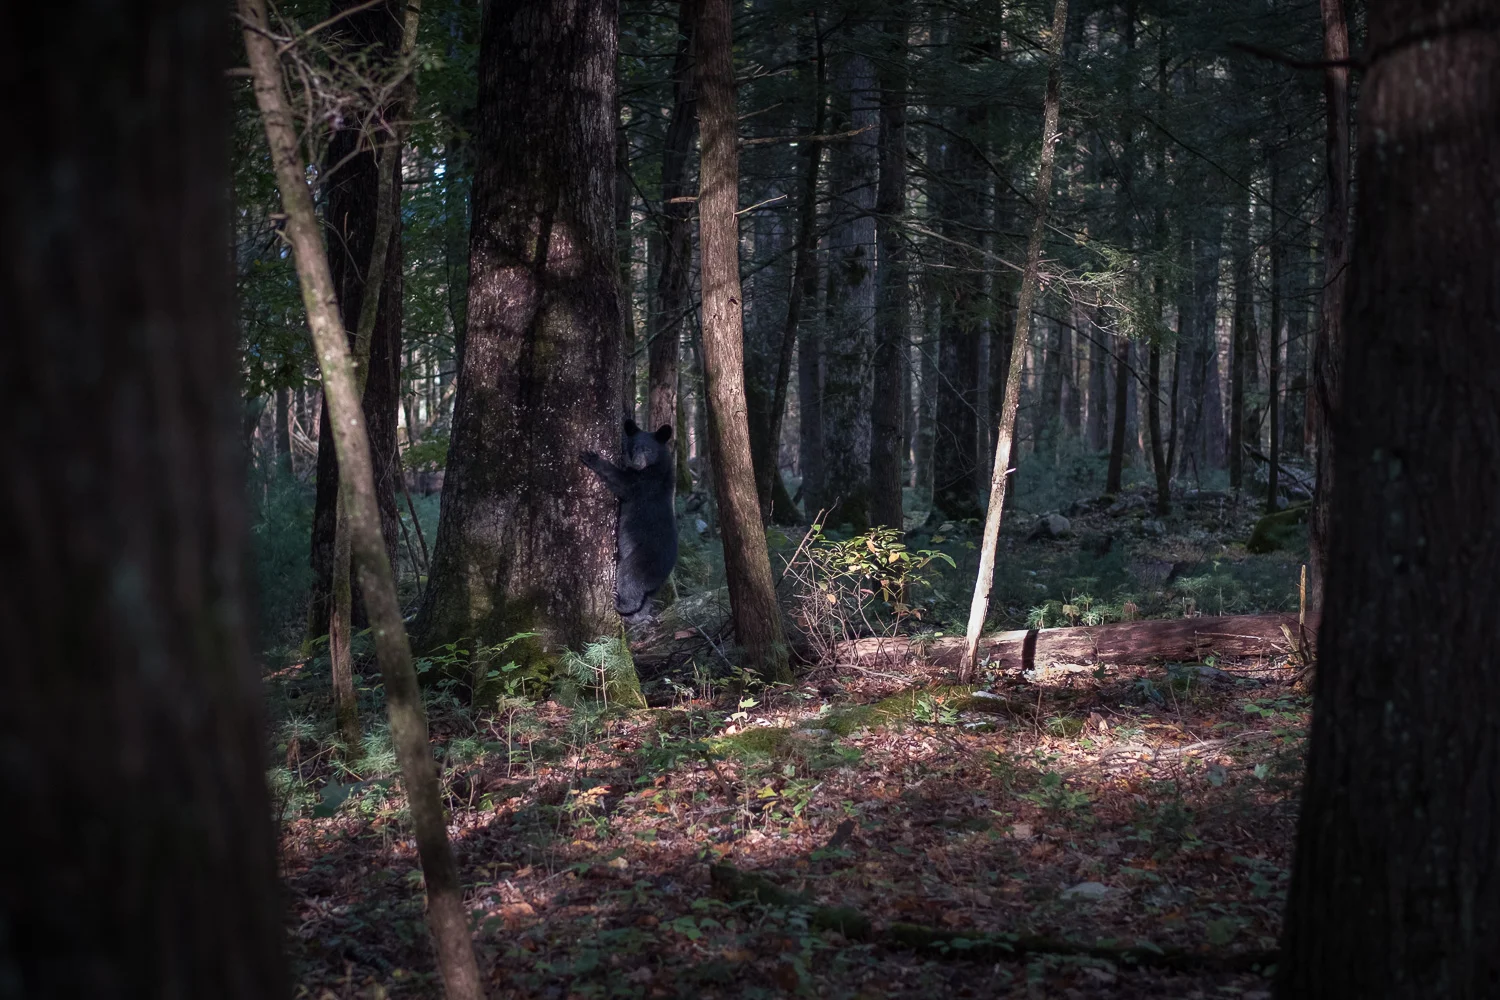
A bear cub photographed with a 50mm (75mm equivalent) and cropped. Park rules require you to keep a 50-yard distance from all wildlife. Fujifilm X-Pro2, 50mm, 1/500 @ f2, ISO 800.

5. Don't forget the wildlife. Cades Cove is full of creatures, big and small. White-tailed deer, bear, turkey, coyotes and other animals are numerous throughout the valley. And the nice thing is you don't need a super long telephoto lens to get great shots. Be respectful and maintain a 50-yard distance from all animals and of course pull off the road. One strategy I've used is to pick a location, park and wait for the wildlife to come to me. After only a few visits you will begin to get a sense of where wildlife will typically appear. Sometimes it might take an hour or longer, but every time I've done this, I've been rewarded. 

There are probably many tips I could offer, but really it boils down to having patience and taking your time. Despite a large number of visitors, Cades Cove is an incredibly peaceful place and no visit to the Great Smoky Mountains National Park would be complete without spending time there. It is also a great place to meet other photographers and to find out what their favorite spots are to photograph. I've always found that most are very eager to share.

INSPIRED BY ART WHILE MAKING ART - PHOTOGRAPHING IN MUSEUMS

At the Corning Museum of Glass in Corning, N.Y., the galleries offer plenty of photographic opportunities. Here, I was drawn to the monochrome look of the background and the contrast with the color and form of the glass. I also like how the shapes created by the silhouettes of museum-goers interact with the curves of the glass. Fujifilm X-Pro2 with a 50mm F2.0 lens, 1/500 @f5.0, ISO 400.

There are many reasons to visit museums, art, history or otherwise, but I find that for me, it's all about being inspired while finding inspiration and at the same time making photographs. And while I love when museums feature photography exhibits, inspiration can come from all kinds of exhibits, such as paintings, mixed media, or the building itself.

Below are five tips to keep in mind when photographing in museums. 

1. If you plan on taking your camera to the museum, make sure they allow photography. I find that most museums today do allow photography with a few caveats. No flash photography, tripods or video are pretty standard. Occasionally, some exhibits will be clearly labeled as off limits to photography. I've also have seen where cell phone use is banned, but have never seen it enforced.

I use the pop of color and door frame to draw you into this photo taken at the National Gallery of Canada in Ottawa. The guard in the doorframe breaks up the scene and adds some life. Fujifilm X-Pro2 with a 50mm F2.0 lens, 1/40 @f2.8, ISO 320.

2. Don't just walk around photographing artwork just to duplicate the artwork. Take the time to see the art in its environment. Or how one piece plays off other pieces in the space. Or does the space or room itself become the focal point of your photograph?

The Royal Ontario Museum located in Toronto, Canada, has a great mixture of exhibits located in a wonderfully designed building. In this photo, I used the straight lines of the windows to contrast with the curved lines of the dinosaur. Choosing to present this as monochrome further emphasizes the patterns. Fujifilm X100S, 1/1250 @f2.8, ISO 800.

3. Be courteous to other museum goers. Don't plant yourself in a way that puts you in a spot which blocks others from viewing exhibits. I like to keep moving until I see something that might make a nice photograph and if taking the photo at that time would impede on others experiences, I'll just take note and circle back. Also be mindful of shutter noise. If your camera has the capability of a silent shutter, this is the time to use it. Otherwise, just be mindful. 

Museums typically have some great natural light and I think in this photo that's what gives it a light airy feel and compliments the art. People can bring a museum to life and like to include them whenever possible, however, I rarely make them the center of attention. It's for that reason that I often use silhouettes or obscure faces. Fujifilm X-Pro2 with a 50mm F2.0 lens, 1/1000 @f2.0, ISO 320.

4. Sometimes I like to find a bench or seat and just wait until a scene comes together. Patience is key. If you sit somewhere long enough you become part of the scene and others won't even notice you. If you are standing in one place with a camera, people may avoid you, not wanted to get in the way of what they perceive you are photographing. Stepping outside the gallery for a few minutes and then returning can reset the natural mood of others.

What caught my eye in this image at the Royal Ontario Museum located in Toronto, Canada, was the rhino behind glass as if it's guarding this gallery, but somehow being held back. Fujifilm X100S, 1/8 @f4.0, ISO 800.

5. Take the time to enjoy your visit as well. Remember the inspiration part of this post? Step back, put down the camera and enjoy the art and exhibits around you. Many times you can also meet other like minded people and strike up a conversation. 

5 TIPS FOR PHOTOGRAPHING IN MUIR WOODS

Occasionally, some light makes its way to the forest floor which adds some nice contrast. Fujifilm XT1, 0.5 sec @ f11, ISO 200.

Occasionally, some light makes its way to the forest floor which adds some nice contrast. Fujifilm XT1, 0.5 sec @ f11, ISO 200.

If you are visiting the San Francisco Bay area, I urge you to take some time and visit Muir Woods National Monument. Located just 12 miles north of the city in Marin County, California, and part of the Golden Gate National Recreational Area, Muir Woods features 240 acres of old-growth Coastal Redwoods and plenty of photographic opportunities.

I recently spent five hours exploring the park and hope that you will benefit from the five photographic tips below.

1. Lens selection. I would probably leave the telephoto behind, but that doesn't mean you need to bring only super wide-angle lenses. The Coastal Redwoods are big and everywhere, so you will not need a telephoto to see them, but adding something in the 70-120mm range would allow you to compress a scene or reach some trees that may be a little further off the path. A longer lens could also come in handy if you want to aim up into the canopy.

As someone who does not shoot a lot of verticals, this location was the exception. Fujifilm XT1,1/2.3 @ f18, ISO 200.

As someone who does not shoot a lot of verticals, this location was the exception. Fujifilm XT1,1/2.3 @ f18, ISO 200.

2. Don't forget the tripod. You will be doing a lot of walking during your visit and you might be tempted to leave the tripod behind. Don't. Even during a bright sunny day, not much light filters down to the forest floor, forcing you to shoot at very slow shutter speeds even if you have fast lenses. And even though tripods are allowed in the park and the paths are fairly wide, remember to be courteous to other visitors, especially during busy times.

"This is the best tree-lovers monument that could possibly be found in all the forests of the world". - John Muir

3. Stay on track. Photography is allowed throughout the park, but you must remain on the paths and boardwalks. There is an easy loop path with an occasional trail that branches off. It took me about four hours to make the loop, but you could certainly do it in less. My recommendation would be to spend the whole day and plan on making several trips around the loop or take advantage of a ranger-led program.

There are a few places along the trail such as Cathedral Grove where you are able to get nice canopy shots from the trail. Fujifilm XT1, 0.3 sec @ f14, ISO 200

There are a few places along the trail such as Cathedral Grove where you are able to get nice canopy shots from the trail. Fujifilm XT1, 0.3 sec @ f14, ISO 200

4. Get there early or late. Normally this tip would refer to taking advantage of the best light, but in this case, it is more about the parking and avoiding the crowds. Parking is very limited, especially on weekends, but even during my weekday visit, I noticed parking was gone, even a mile down the road when I left the park around 2 p.m. Another option would be to take the Muir Woods shuttle which runs weekends from April 4th through October 25th. The park is open from 8 a.m. to sunset.

Don’t lose sight of the forest for the trees, or in this case, take the time and look for details among the trees.  Fujifilm XT1, 1/13 sec @ f4.5, ISO 200

Don’t lose sight of the forest for the trees, or in this case, take the time and look for details among the trees. Fujifilm XT1, 1/13 sec @ f4.5, ISO 200

5. Big picture - small picture. I was amazed by how much these Coastal Redwoods would impact me. Their size and beauty had me yearning to just shoot wide, take it all in with every frame. But that didn't always convey the true size of these magnificent trees as I reviewed the pictures. Force yourself, as I did, to try other focal lengths in order to achieve a different look. And if you have a macro lens, be sure to bring that too. There are incredible textures everywhere and plenty of interesting subjects on the ground if you can manage to look down.

Shooting from a low angle with a wide-angle lens enhances the grandeur. Fujifilm XT1, 1/8 @ f8, ISO 400.

Shooting from a low angle with a wide-angle lens enhances the grandeur. Fujifilm XT1, 1/8 @ f8, ISO 400.

Finally, be sure to take some time and relax during your visit. Since the lighting is fairly constant, there really is no need to rush, or limit your visit to the "best time" of the day for shooting. Find a bench, take a seat, and just enjoy this beautiful redwood forest that William and Elizabeth Kent donated to the federal government in 1908.

Download a PDF to learn more about the history of the park and the California Redwoods.

5 TIPS FOR PHOTOGRAPHING THE GOLDEN GATE BRIDGE

The Golden Gate Bridge a half hour prior to sunrise. 30 sec. @ f8, ISO 200.

The Golden Gate Bridge a half hour prior to sunrise. 30 sec. @ f8, ISO 200.

Before I get to my five tips, I will state right up front that much like my blog post,  Five Tips for Shooting Antelope Canyon, this was my first time photographing the Golden Gate Bridge. I say that only to admit that I'm not the expert and in fact, welcome comments, additional tips or even to tell me I'm wrong.

However, as a professional photographer, you might find it interesting how I approach a subject that I never photographed and only have a limited time to do so. In this case, I was in San Francisco for three days, but all of that time was not dedicated to taking pictures of possibly the most photographed bridge in the world. Also of note, all of the photos were taken with a Fujifilm X-T1 mirrorless camera that I had for review.

Consider a rental car or Zip car so you can get to locations away from the crowds, like this photograph of the bridge taken from Point Bonita Lighthouse just before sunset. 1/18 @ f22, ISO 200.

Consider a rental car or Zip car so you can get to locations away from the crowds, like this photograph of the bridge taken from Point Bonita Lighthouse just before sunset. 1/18 @ f22, ISO 200.

Also, while it is possible to get to the Golden Gate Bridge via public transportation, tour bus or even by bike, renting a car seems to be the easiest and most convenient way to get to many of the shooting locations, especially if you have limited time or want the ultimate flexibility to chase light.

1. Location, location, location.

There are numerous locations or vantage points to photograph the bridge and I'll cover just a few even though I'm sure locals have all kinds of hidden spots picked out.

I shot from three basic locations on the North side and two on the South or San Francisco side of the bridge. On the North, it was Vista Point, Battery Spencer, Marin Headlands (Hawk Hill) and on the South, Lands End, and the South Side parking lot.

Vista Point is the first exit after crossing the bridge heading north and while it offers an alright view of the bridge, my suggestion would be to skip the crowded parking lot and head down the hill towards the Coast Guard Station where you can view the bridge from a low angle. Then walk up to the Vista Point visitors center for an additional view.

A different look at the bridge from Battery Spencer. 1/1700 @ f3.2, ISO 400.

A different look at the bridge from Battery Spencer. 1/1700 @ f3.2, ISO 400.

After leaving Vista Point cross under the bridge and start the climb up Conzelman Rd. making Battery Spencer your first stop. This is a great location and it was the first place that I stopped to photograph the bridge. I was surprised how close the bridge was and you feel like you are at eye level with the bridge towers. Nice vantage point to shoot verticals too.

After leaving Battery Spencer, you continue to climb until you reach the highest point, Hawk Hill. From this vantage point, you get a great overview of the bridge with the city behind it. Don't forget to explore the old World War II batteries while you are there and if you continue on foot through former gun emplacement tunnels to the other side, you will have a bonus view of the Point Bonita Lighthouse.

There are several stopping points along the way so take your time and pull over every chance you get either on the way up or on the return trip, because the view is different and unique each time.

Screen shot from my iPad of the SunSeeker App showing my location and sun direction on the morning of March 17, 2015, as I was attempting to photograph the sunrise. One of the nice things about this App is that you can pick a day and time in the fut…

Screen shot from my iPad of the SunSeeker App showing my location and sun direction on the morning of March 17, 2015, as I was attempting to photograph the sunrise. One of the nice things about this App is that you can pick a day and time in the future so that there are no surprises, except for maybe rain and fog.

2. Timing is everything.

Make sure to leave yourself enough time and shooting days to capture the bridge during different times of the day. If you are planning to shoot sunrise or pre-sunrise from Hawk Hill, Conzelman Rd. is closed about a half mile from the top until after sunrise. There is a parking lot, so join the bicyclists and joggers as you make your way to the top. Not too bad, but don't be surprised as I was.

Once again, I used the Sunseeker App to determine sun direction which helps determine where I'm going to start and end my day. Knowing where the sun will be during certain times of the day can help you pre-visualize photographs as you drive around scouting locations.

The Vista Point visitor center gets crowded with both cars and people. I found most people moved on quickly so if you want a particular shot, just wait a few minutes. 1/100 @ f11, ISO 200.

The Vista Point visitor center gets crowded with both cars and people. I found most people moved on quickly so if you want a particular shot, just wait a few minutes. 1/100 @ f11, ISO 200.

3. Avoid the crowds.

It is clear that you are not the first person who has thought about photographing the Golden Gate Bridge, so be prepared for crowds, especially at the visitors centers. Sometimes you may also have to pass by a pull-over because it is full, but remember there will be another. It was my experience that if you have a little patience while people grab their selfies, they will move on allowing you to get your shot.

And as in most situations, you lessen your chance of running into crowds by getting there early and staying late. After all, isn't that the best time to shoot anyway? So take a break in the middle of the day and head over to Sausalito for some tacos and Mexican beer at the Salsalita Taco Shop while everyone else is fighting for a spot to photograph the bridge in the noon time sun.

Think about details and capturing pieces of the bridge, even from underneath. This was taken while walking from the Coast Guard station up the hill to the Vista Point parking area. 1/350 @ f9, ISO 200.

Think about details and capturing pieces of the bridge, even from underneath. This was taken while walking from the Coast Guard station up the hill to the Vista Point parking area. 1/350 @ f9, ISO 200.

4. Look for something different.

The temptation is to go wide and take in the entire bridge. That makes a nice shot and sets the stage, but don't forget about details. With a telephoto lens, you can pick out details from many of the shooting locations I mentioned previously, but there are also places to access the bridge from underneath. And while I didn't get the chance on this trip, you can also walk or bike across the bridge, which would certainly get you up close and personal.

Among the first photographs I took of the bridge, was as I made the short climb at Battery Spencer which puts you at eye level with the bridge towers and in this case almost in the clouds. 1/60 @ f10, ISO 400.

Among the first photographs I took of the bridge, was as I made the short climb at Battery Spencer which puts you at eye level with the bridge towers and in this case almost in the clouds. 1/60 @ f10, ISO 400.

5. Weather can be your friend.

I could state the obvious and just say that the weather, especially clouds and fog, are unpredictable in San Francisco, or I could tell you to embrace it and use it to your advantage. On my first day photographing the bridge, I could only make it half way up Conzelman Rd. before the visibility dropped to near zero. But those same clouds added something to my photos taken from Battery Spencer when they covered just the top of the bridge.

The point is, don't make a judgment from your hotel room downtown. Get out to the locations you scouted and see for yourself because you never know when the weather will change and maybe even change in such a way that takes your photograph from alright to awesome.

Photographed from the trail at Lands End. I rarely use presets, but something about this photograph reminded me of a classic postcard, so I added Yesteryear, and Rounded Corners White presets in Lightroom 5. 1/2000 @ f4, ISO 200.

Photographed from the trail at Lands End. I rarely use presets, but something about this photograph reminded me of a classic postcard, so I added Yesteryear, and Rounded Corners White presets in Lightroom 5. 1/2000 @ f4, ISO 200.

As I said at the beginning of this blog post, there are many more locations to explore and photograph the bridge such as Crissy Field, Fort Point, Point Cavallo, Baker Beach and many, many more. In fact, maybe three days is not enough time.

So make the trip, have fun, and when not photographing the bridge, there are all kinds of other wonderful locations around the city to photograph.

MAKING TIME TO PHOTOGRAPH THE NORTHERN LIGHTS

A slightly longer shutter speed allowed additional colors to appear. 1/8 @ f2.8, ISO 3200.

A slightly longer shutter speed allowed additional colors to appear. 1/8 @ f2.8, ISO 3200.

One benefit of traveling on assignment is that you often find yourself in places that you might not otherwise have had the opportunity to visit. And whenever I find myself in these locations, I make it a point to take full advantage of all the photographic opportunities available.

Just to be clear, the assignment that I'm getting paid for always comes first, which means that I really have to muster the energy to do personal work. This was certainly the case on a recent trip to Fairbanks, Alaska, to document Navy-sponsored Arctic research.

Prior to any trip, I will conduct a web search looking for things to do and see at that location. Imagine my surprise when I kept seeing photographs of the Aurora Borealis, or Northern Lights. Was it possible that I would get the chance to not only see this but photograph it? For some reason, I thought you had to be much farther north.

The intensity of light was constantly changing which meant I had to keep adjusting shutter speed. 1/2 @ f2.8, ISO 3200.

The intensity of light was constantly changing which meant I had to keep adjusting shutter speed. 1/2 @ f2.8, ISO 3200.

As you can see from the photographs accompanying this blog that I was treated to a spectacular sight. Some tips and a little more about what it took to take these photographs follows.

1. Getting the photograph means you might lose a little sleep. Rarely are the best outdoor or landscape photographs taken at mid-morning, just after a leisurely breakfast and before a long lunch. Most of the time getting the best photographs means setting up before the sun rises and staying out after it sets. Of course, there is still time for that leisurely lunch, and maybe a nap in the middle of the day, unless you are getting paid to be there, then you have to make the extra effort. So to photograph the Northern Lights I had to set my alarm for midnight, and not just one night, but for three nights in a row until I finally found success.

2. Shooting something for the first time means experimentation. I had never photographed the Northern Lights, but I have photographed stars, so I knew that I first needed a location away from the city lights, which in Fairbanks meant about a ten-minute drive. Ideally, you would scout these locations during the day, but remember since I was on an assignment, I had to locate a safe and awesome location in the dark, which I fortunately did. On the second night, it was clear and the sky was filled with stars, but I didn't see signs of the Aurora Borealis. However, just because I didn't see what I was looking for, didn't mean I wasn't going to still take pictures.

I did not realize that I had captured a faint glow of the Northern Lights on the second night until I downloaded and post processed my photos. 1/13 @f2.8, ISO 1600.

I did not realize that I had captured a faint glow of the Northern Lights on the second night until I downloaded and post processed my photos. 1/13 @f2.8, ISO 1600.

3. Sometimes luck, even beginners luck, is your friend. If you asked me when I returned to the hotel that second night if I had any success, I would have said no. So imagine my surprise when I imported the images into Lightroom 5 and saw the subtle green and yellow hue in the sky. After some post-processing, I liked the images enough to share but still felt I missed out since I didn't actually see anything with my own eyes. Don't give up just because you don't see anything with your naked eye.

4. Persistence pays off. On the third night I once again woke up at midnight and headed back to the same location as the previous night, only this time as soon as I stepped out of the car, even before my eyes adjusted to the darkness, I could see streaks of green in the sky. By the time I set up my tripod and camera, the lights were sweeping across the night sky. I started with the same camera settings as I had the previous night and could tell right away that I wasn't even close. Remember tip two, experiment and don't get flustered. This time instead of a standard night star setup of a 15-20-second exposure at ISO 3200, I was at a two to four-second exposure at ISO 1600. Any longer on the exposure time and the lights were really soft because they were moving and "dancing" so fast. Given more time, I probably would have experimented more with that longer exposure.

5. Look 360 degrees. At first, I was really focused in one direction which had a good foreground of pine trees. It wasn't until I relaxed a bit, turned and started looking around, that I realized there were photo opportunities everywhere, even straight up. I just kept shooting with the Nikon 24-70mm and even though I did bring the 70-200mm with me, for some reason I left the 14-24mm lens in the room. In total, I spent close to an hour taking pictures and if it wasn't for that pesky aforementioned assignment, I would have stayed all night.

Even shooting vertical at 24mm I was not able to capture everything I was seeing. 1/5 @ f 2.8, ISO 1600.

Even shooting vertical at 24mm I was not able to capture everything I was seeing. 1/5 @ f 2.8, ISO 1600.

After seeing the Northern Lights with my own eyes, I don't regret any sleep I missed and even as I sit here in the Anchorage airport on a five-hour layover and yet another 16 hours before I'm back in Virginia, the lights are still burning bright in my eyes.

Bonus tip:

Many of the hotels in Fairbanks maintain a wake-up list if you wish to be notified whether the Aurora Borealis is active on a particular night. My advice, just head outside and shoot; you may discover more in your photograph than you expected.