Fujifilm

INSPIRED BY ART WHILE MAKING ART - PHOTOGRAPHING IN MUSEUMS

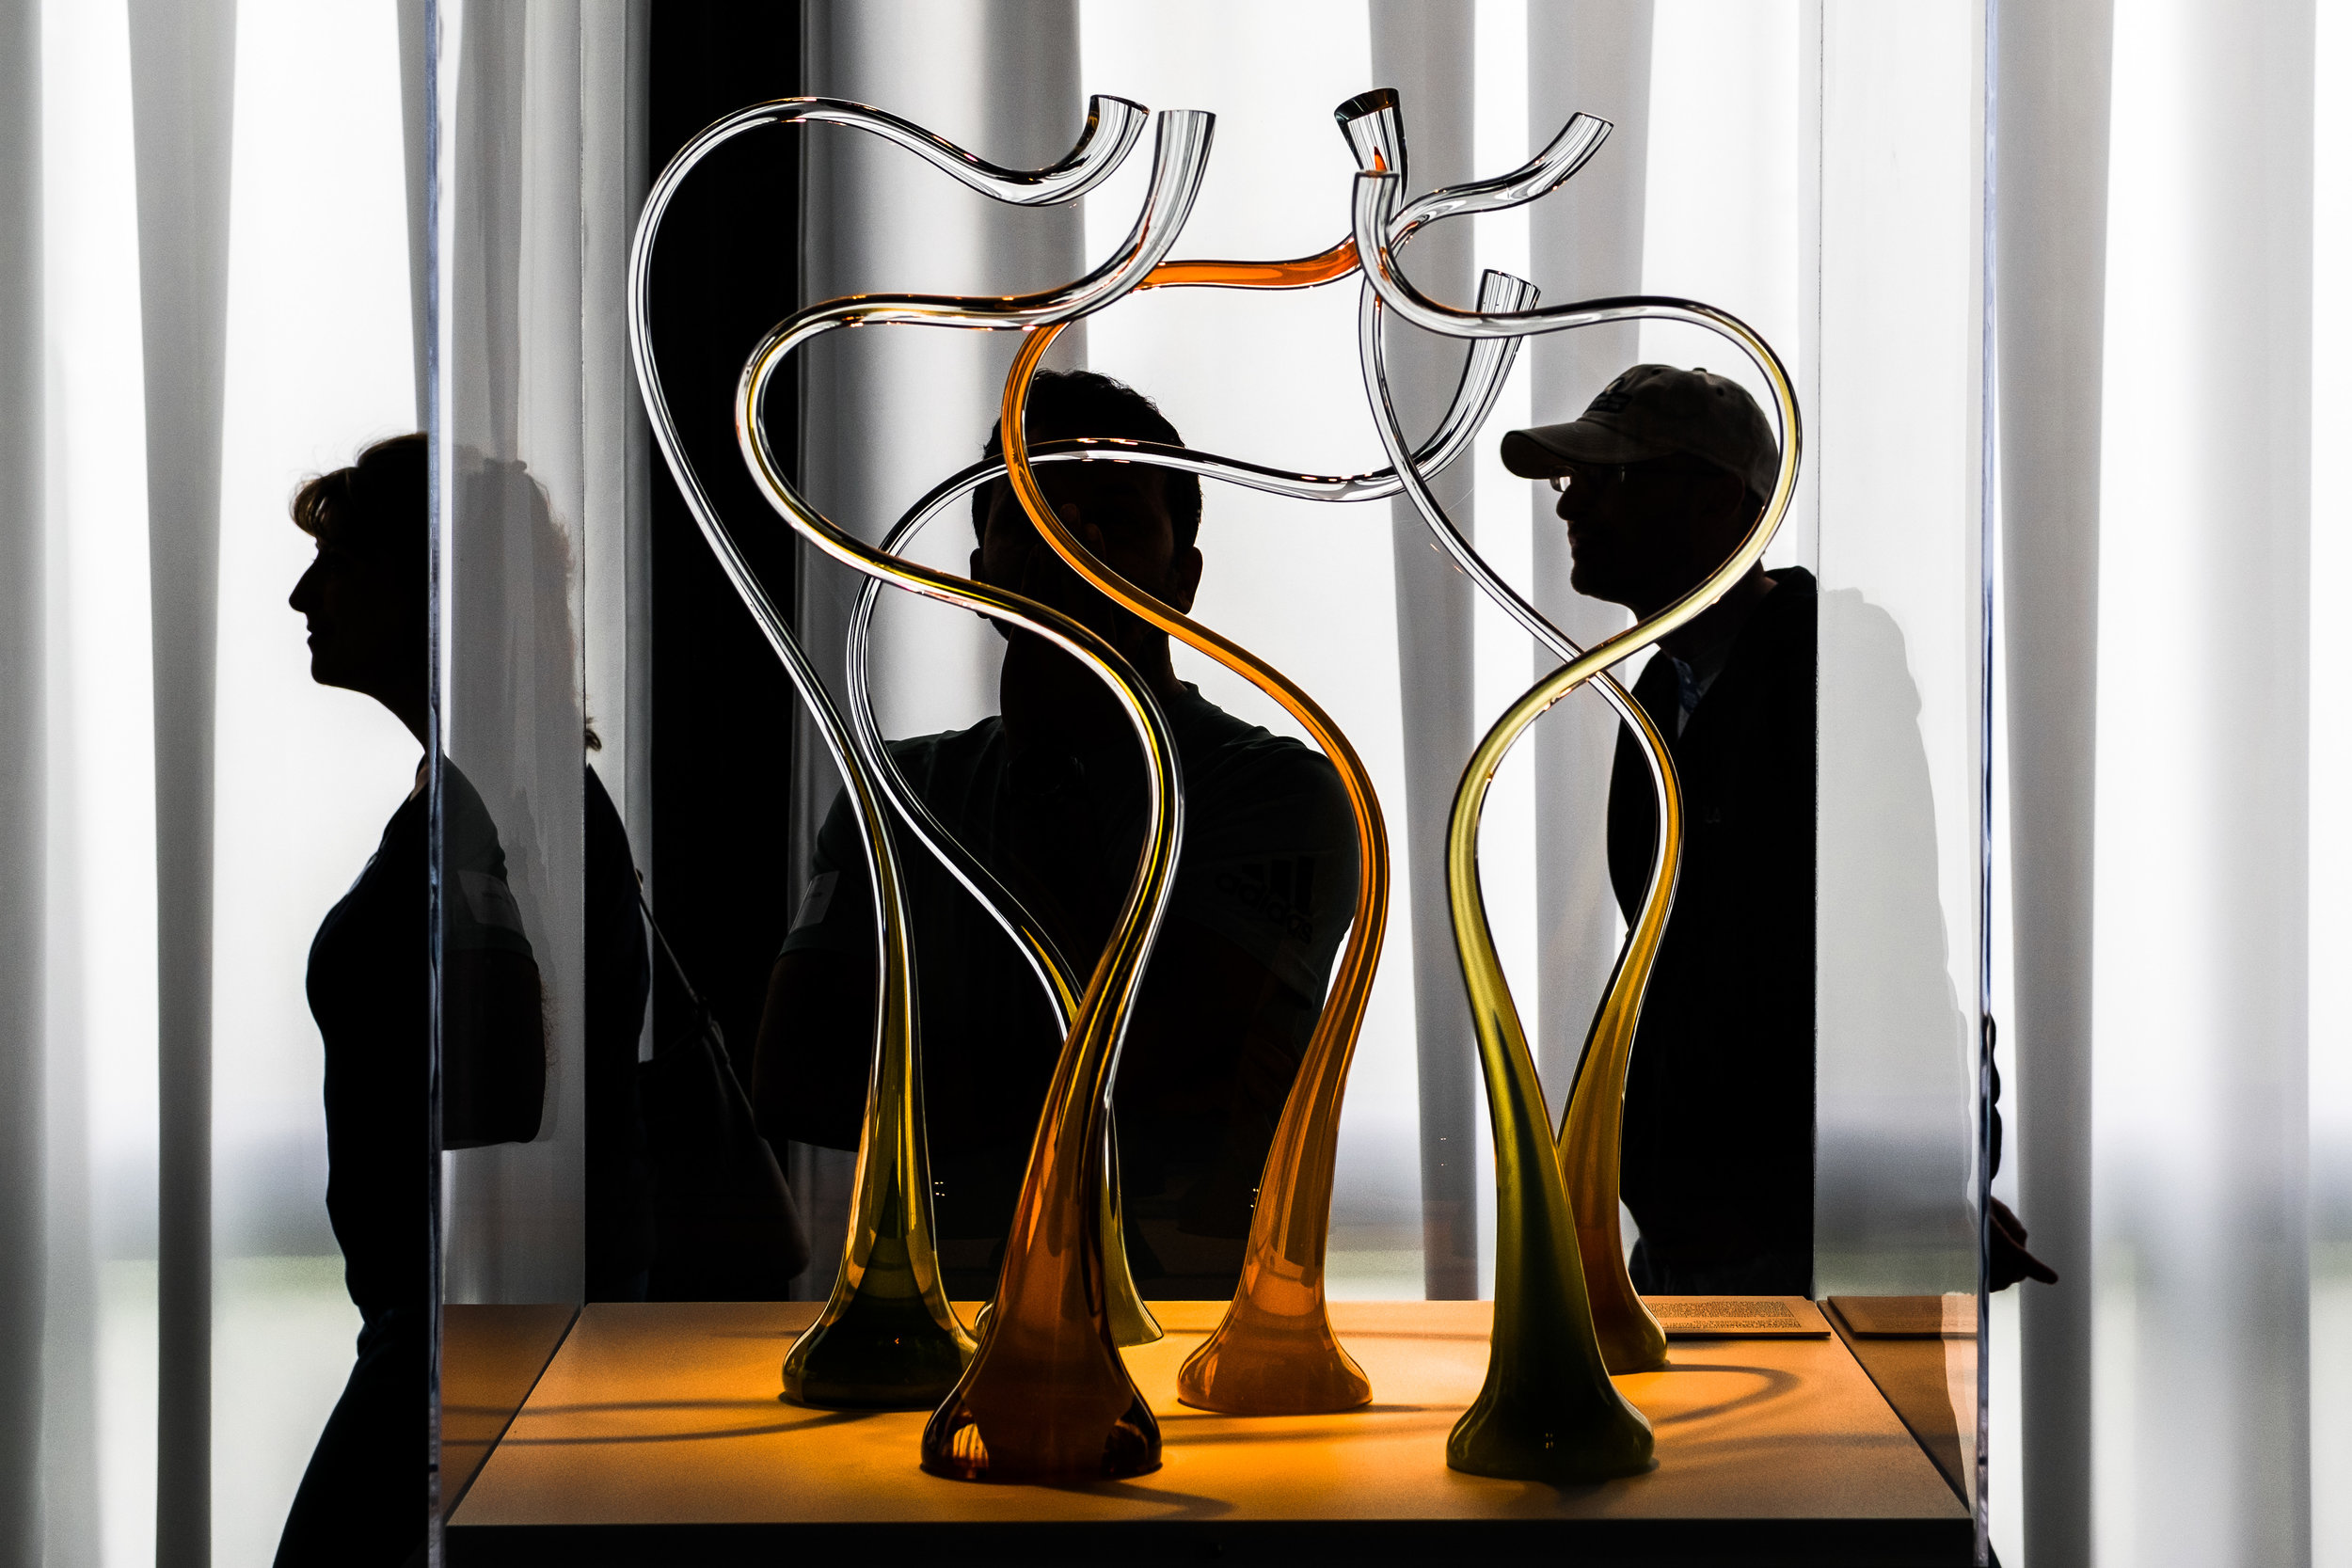
At the Corning Museum of Glass in Corning, N.Y., the galleries offer plenty of photographic opportunities. Here, I was drawn to the monochrome look of the background and the contrast with the color and form of the glass. I also like how the shapes created by the silhouettes of museum-goers interact with the curves of the glass. Fujifilm X-Pro2 with a 50mm F2.0 lens, 1/500 @f5.0, ISO 400.

There are many reasons to visit museums, art, history or otherwise, but I find that for me, it's all about being inspired while finding inspiration and at the same time making photographs. And while I love when museums feature photography exhibits, inspiration can come from all kinds of exhibits, such as paintings, mixed media, or the building itself.

Below are five tips to keep in mind when photographing in museums. 

1. If you plan on taking your camera to the museum, make sure they allow photography. I find that most museums today do allow photography with a few caveats. No flash photography, tripods or video are pretty standard. Occasionally, some exhibits will be clearly labeled as off limits to photography. I've also have seen where cell phone use is banned, but have never seen it enforced.

I use the pop of color and door frame to draw you into this photo taken at the National Gallery of Canada in Ottawa. The guard in the doorframe breaks up the scene and adds some life. Fujifilm X-Pro2 with a 50mm F2.0 lens, 1/40 @f2.8, ISO 320.

2. Don't just walk around photographing artwork just to duplicate the artwork. Take the time to see the art in its environment. Or how one piece plays off other pieces in the space. Or does the space or room itself become the focal point of your photograph?

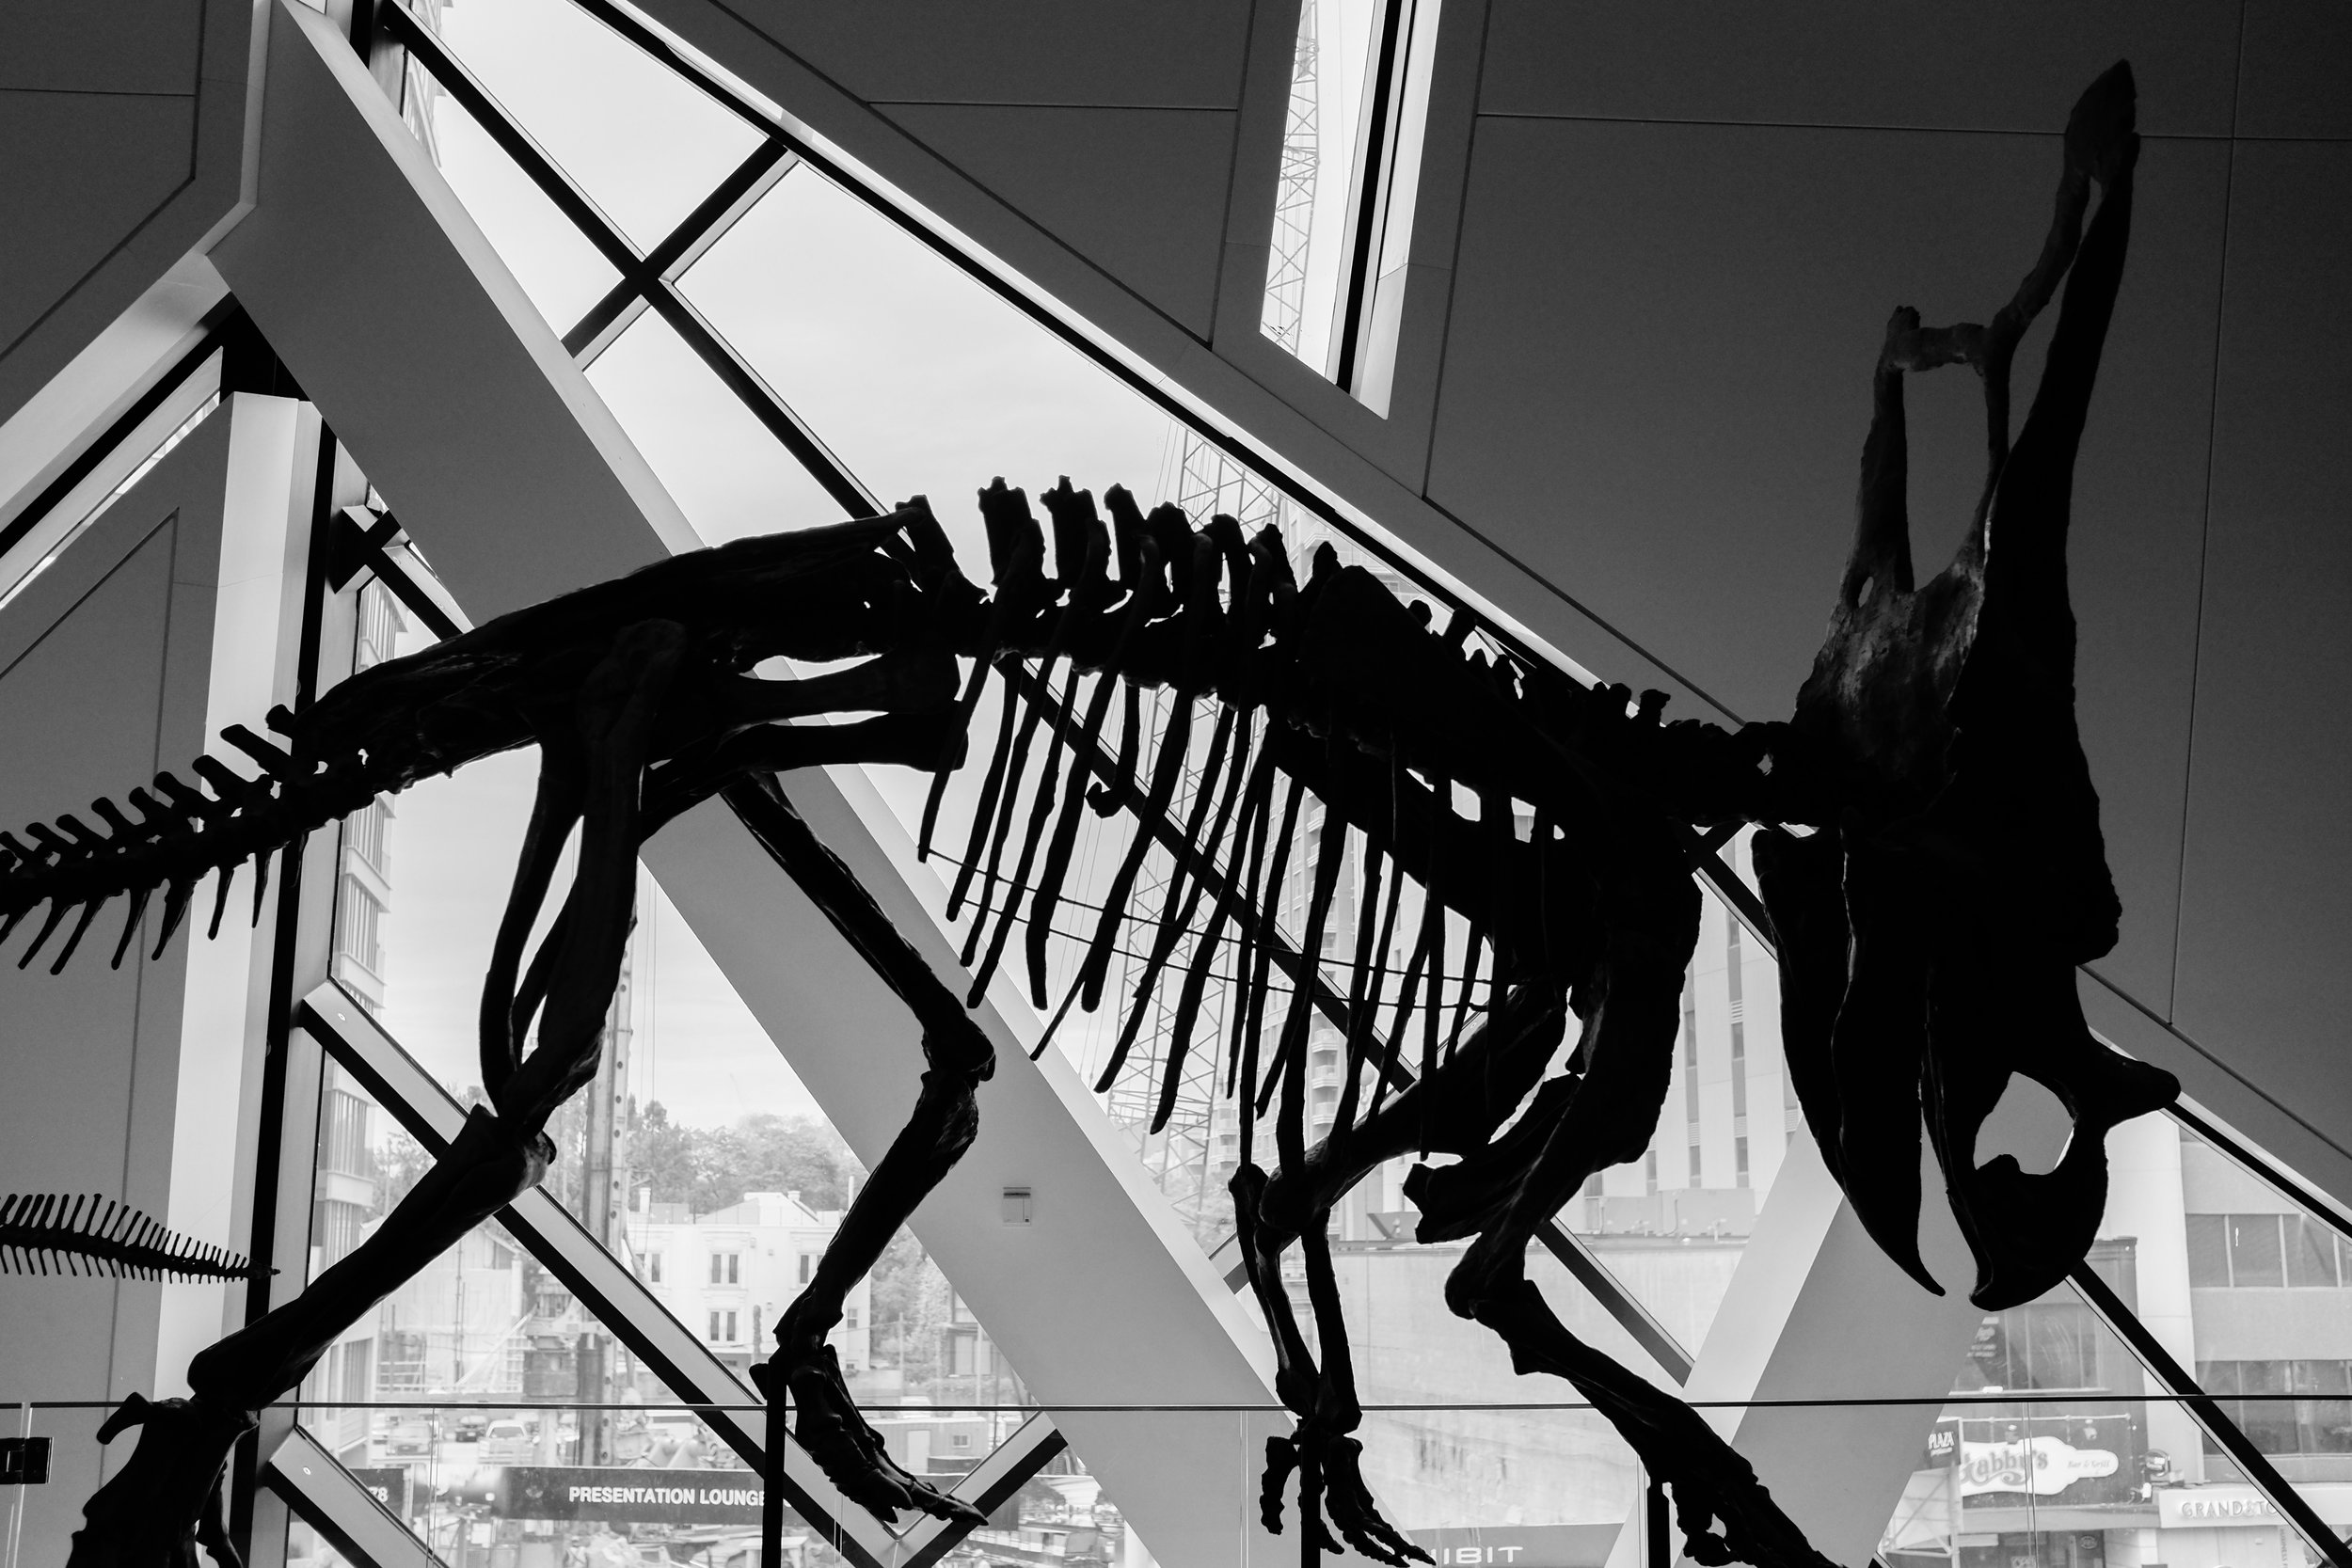
The Royal Ontario Museum located in Toronto, Canada, has a great mixture of exhibits located in a wonderfully designed building. In this photo, I used the straight lines of the windows to contrast with the curved lines of the dinosaur. Choosing to present this as monochrome further emphasizes the patterns. Fujifilm X100S, 1/1250 @f2.8, ISO 800.

3. Be courteous to other museum goers. Don't plant yourself in a way that puts you in a spot which blocks others from viewing exhibits. I like to keep moving until I see something that might make a nice photograph and if taking the photo at that time would impede on others experiences, I'll just take note and circle back. Also be mindful of shutter noise. If your camera has the capability of a silent shutter, this is the time to use it. Otherwise, just be mindful. 

Museums typically have some great natural light and I think in this photo that's what gives it a light airy feel and compliments the art. People can bring a museum to life and like to include them whenever possible, however, I rarely make them the center of attention. It's for that reason that I often use silhouettes or obscure faces. Fujifilm X-Pro2 with a 50mm F2.0 lens, 1/1000 @f2.0, ISO 320.

4. Sometimes I like to find a bench or seat and just wait until a scene comes together. Patience is key. If you sit somewhere long enough you become part of the scene and others won't even notice you. If you are standing in one place with a camera, people may avoid you, not wanted to get in the way of what they perceive you are photographing. Stepping outside the gallery for a few minutes and then returning can reset the natural mood of others.

What caught my eye in this image at the Royal Ontario Museum located in Toronto, Canada, was the rhino behind glass as if it's guarding this gallery, but somehow being held back. Fujifilm X100S, 1/8 @f4.0, ISO 800.

5. Take the time to enjoy your visit as well. Remember the inspiration part of this post? Step back, put down the camera and enjoy the art and exhibits around you. Many times you can also meet other like minded people and strike up a conversation. 

FINDING PHOTOGRAPHS IN JOSHUA TREE NATIONAL PARK

The light that appears just after sunrise is special. In this case, I liked how it made the sand colored mountains glow. I wanted something in the foreground and picked this lone josohua tree which I originally thought about shooting in silhouette, however, as the sun began to rise above the mountains behind me I knew I would have a few minutes where the sun lit the top of the tree, but before it lit me and cast my shadow into the scene. Sometimes missing the actual sunrise is fine.  Fujifilm X-Pro2 with a Fujinon XF 35mm f2 R WR, 1/60 @ f14, ISO 200.

It was still dark outside when I left Oceanside, Calif., on my way to Joshua Tree National Park, hoping to arrive in time to photograph the sunrise. As I made my way west on the I-10, still some 40 miles from my destination, a place I've never been, and the sky began to slowly lighten, it became evident that I was probably going to miss another sunrise.

It was only then when I recognized a familiar anxiety, which shouldn't exist, yet an anxiety that creeps in almost every time I decide to make one of these personal photo trips. Why do I put any kind of pressure on myself and why does it matter if I miss the sunrise? Am I really missing the sunrise if I'm watching it with my eyes? Do I have to actually capture the sunrise in a photograph in order to alleviate the anxiety? These are the questions I struggle with.

During the middle of the day I had a great time exploring a section of the national park called Jumbo Rocks. Lots of fun climbing around the granite rock formations in search of interesting shapes. I thought the light wrapping around this particular boulder which was balancing on an even bigger boulder made a nice composition. Choosing to convert to monochrome during post  processing helps to focus on that composition as does using a red filter, which turns the blue sky almost black. Fujifilm X-Pro2 with a Fujinon XF 35mm f2 R WR, 1/900 @ f8.0, ISO 200.

The strange thing is that I rarely feel this kind of anxiety when I'm on a paid assignment, like the one I just finished the day before. I feel pressure for sure, but somehow it's not the same. I've reflected on this before, this feeling that I have to get a remarkable image or somehow the trip was a waste.

Of course, the reality is that I normally come back from all of these trips with at least some photographs that I'm proud of. What I am certain of though is that I do return from these trips with memories of a great experience. Maybe that is more of the point.

I kept noticing how these lines of a different type of rock  made their way through the giant granite formations. In this case, I used the line to lead the viewer into the photo. Fujifilm X-Pro2 with a Fujinon XF 35mm f2 R WR, 1/680 @ f11, ISO 200.

I'm fortunate that I get paid to take photographs. And I'm also fortunate that I get to travel in pursuit of those photographs. And when I can extend that trip in order to experience a new location with my camera, I try to take full advantage of it.

One of the best things about photographing during the winter months is that the sun sets early enough that there is still plenty of time for dinner. What is difficult, however, is with close to 800,000 acres of land, how do you find the perfect spot to photograph that sunset in Joshua Tree National Park. During my travels through the park earlier in the day, I found a section with a lot of trees, so I returned to that spot and after about 20 minutes of walking around as the sun dropped behind a distant mountain, I found a nice composition and made my final photo of the trip. Fujifilm X-Pro2 with a Fujinon XF 16mm f1.4 R WR, 1/60 @ f9.0, ISO 200.

Sometimes on these personal trips, I just need to remind myself to slow down, realize that there is not a deadline and that there is not an editor waiting for the results. These trips are about me and my camera and capturing memories. And sometimes when I miss that photo of a sunrise, I need to remind myself that I still had the experience and know that I'm fine with that.

ASSATEAGUE, CHINCOTEAGUE - HORSES OR PONIES?

Chincoteague Ponies. 1/1600 @ f5.6, ISO 400. Nikon D4S, 300mm 2.8 with 2x teleconvertor.

Chincoteague Ponies. 1/1600 @ f5.6, ISO 400. Nikon D4S, 300mm 2.8 with 2x teleconvertor.

For a couple of years, I've had Assateague and Chincoteague on my photographic trip list and with a few days off I finally decided to make it a reality. But first, I was a little confused about the difference between the two locations.

I'll try and break it down. The whole island is Assateague and is located in both Virginia and Maryland. The Chincoteague National Wildlife Refuge is on Assateague Island but located in Virginia. Assateague Island National Seashore is located in Maryland and is a U.S. National Park. 

Well, are they horses or ponies? Apparently they are referred to as Assateague Horses and Chincoteague Ponies, although they really are all ponies due to their size. At the Assateague National Seashore, the horses are free to roam while on the Chincoteague National Wildlife Refuge they are penned in and not free to roam Assateague Island. Confused?

It really doesn't matter because both locations should be on your trip list and I saw plenty of horses, or should I say ponies, in both locations as well as plenty of other wildlife and many great locations to photograph during a day and a half visit.

Assateague sunset. 1/10 @ f20, ISO 200. Nikon D4S, 14-24mm at 14mm.

Assateague sunset. 1/10 @ f20, ISO 200. Nikon D4S, 14-24mm at 14mm.

I arrived at Assateague National Seashore around noon and spent the remainder of the day taking short hikes, scouting locations, and of course stalking horses. One thing I noticed after crossing the bridge to the island and before I arrived at the park entrance was how close the marsh was to Bayberry Drive and that in several spots there was room to pull over. I knew then that it would be a great place to photograph the sunset.

And it was at one of these spots that I took the photograph above. Setting my tripod low in order to emphasize the foreground I was drawn to the green plant life in the water as well as the interesting pattern created by the marsh itself. This all came together and It actually makes this a much better photo despite what turned out to be a mediocre sunset.

Assateague Horses. 1/2000 @ f5.6, ISO 400. Nikon D4S with a 300mm 2.8 and 2x teleconverter.

Assateague Horses. 1/2000 @ f5.6, ISO 400. Nikon D4S with a 300mm 2.8 and 2x teleconverter.

I spotted these horses while on the Life of the Marsh trail which is a short loop boardwalk trail located off of Bayside Drive. And it's a good thing it was short because initially I only had the 80-400mm lens with me when I first spotted them so I returned to my car and retrieved a 300mm lens and 2x teleconverter to get this shot.

I like the two pools of water in the foreground marsh which adds some depth and helps bring you into the frame. These horses and ponies spend a lot of time with their heads in the grass eating, so patience and timing are needed in order to catch even one of them looking up. 

Chincoteague sunrise. 1/640 @ f5.3, ISO 200. Nikon D4S, 80-400mm at 195mm.

Chincoteague sunrise. 1/640 @ f5.3, ISO 200. Nikon D4S, 80-400mm at 195mm.

Chincoteague is about one and a half hours drive from Assateague so it is possible to photograph them both in a single day, at least during this time of year. Or, as I found out if you "camp" in Walmart parking lots, spending half the night in Fruitland, Maryland, and half the night in Ocean City, Maryland, it is a much longer trip than it should be and because of that, I almost missed the sunrise. Next time I'm camping on the beach in the National Park or staying in a hotel on Chincoteague Island, both better alternatives.

One tip I read prior to the trip is that if you wanted to see the ponies on Chincoteague you should drive along Beach Road until you come to a section where marsh is on each side and there is ample room to pull over. Ponies will be to the right, but I found it to be a great spot to catch the sun rising over Swans Cove Pool on the left. This tip saved the day and my sunrise shots.

Swans Cove Pool, Chincoteague. 1/800 @ f5.6, ISO 400. Nikon D4S with a 300mm 2.8 and 2x teleconvertor.

Swans Cove Pool, Chincoteague. 1/800 @ f5.6, ISO 400. Nikon D4S with a 300mm 2.8 and 2x teleconvertor.

After the sun cleared the horizon, I began to focus on the various birds that were gathering in the foreground. There was still some great warm light coming from behind the birds, so I just waited for them to take flight and used that strong backlight to ensure separation from the background.

Assateague Lighthouse. 1/340 @ f5.6, ISO 200, exposure compensation +0.7. Fujifilm X-Pro2 with a 35mm (50mm equivalent).

Assateague Lighthouse. 1/340 @ f5.6, ISO 200, exposure compensation +0.7. Fujifilm X-Pro2 with a 35mm (50mm equivalent).

One thing I always consider after choosing a photo destination is how I will spend the middle of the day. It could be a nap, long lunch, exploring the visitor center, or scouting locations, but on Chincoteague, it was the Assateague Lighthouse that captured my attention.

Sometimes a scene just presents itself and as entered the small clearing following a very short hike, I was immediately struck by the geometric patterns of the buildings and tower, the contrast between the white trim and red body and the light and shadows created by the surrounding trees. I also knew that this would look great in black and white.

Assateague beach. 1/250 @ f2.8, ISO 200. Fujifilm X-Pro2 with a 35mm (50mm equivalent).

Assateague beach. 1/250 @ f2.8, ISO 200. Fujifilm X-Pro2 with a 35mm (50mm equivalent).

The other thing I did during the middle of the day was to explore the beaches, or more accurately, set up a chair and just enjoyed the sounds and smells of the ocean. You could probably spend most of the day photographing the sand dunes and the birds along the coast. I only took a few photos along the beach but liked the subtle texture and slight warmth of this image.

Do yourself a favor and visit Assateague Island, enjoy the beaches, wildlife, and the beautiful sunsets and sunrises, but I would suggest you do it during the off-season.

HAWAII WITH THE FUJIFILM X-PRO2

On the first day as I wandered around Waikiki Beach trying to overcome some jet lag, I came across these kids being kids. I watched for a little bit before taking any photos and while they were aware I was there, they soon just went back to timing t…

On the first day as I wandered around Waikiki Beach trying to overcome some jet lag, I came across these kids being kids. I watched for a little bit before taking any photos and while they were aware I was there, they soon just went back to timing the surf and leaping from the pier. I liked this photo best because while most of these kids jumped feet first, this girl just went for it.  1/680 @ f5.6, ISO 200.

During a recent trip to Honolulu, Hawaii, I had my first chance to spend some time walking around with my new Fujifilm X-Pro2. In the previous post, I explained my initial camera setup and my thoughts behind those choices. In this post, I'll discuss whether I stuck with those choices and share a few things I learned.

The camera handled great, felt good to carry and performed up to my expectations. That really isn't a surprise, however, I was surprised by how much I liked it more than the X-Pro1. Granted, I only spent a week with the X-Pro1, but Fuji really did take the time to improve this camera versus the original. Little things, but well thought out.

As the sun dipped below the horizon, it didn't take long for it to get dark. I was photographing surfers and paddle boarders coming ashore when I noticed a hotel's flood light illuminating a patch of sand, so I positioned myself hoping that some act…

As the sun dipped below the horizon, it didn't take long for it to get dark. I was photographing surfers and paddle boarders coming ashore when I noticed a hotel's flood light illuminating a patch of sand, so I positioned myself hoping that some action would take place in or near the light. I like the warm yellow light contrasting with the blue ocean and sky and that last hint of pink. I think that just enough light reaches the subjects and ensures that they weren't in silhouette. 1/35 @ f2.0, ISO 3200. 

I stuck to shooting Auto ISO with my max ISO set to 3200. I was happy with the results, but I may up that to 6400. During this trip, I was working during the day (video project) so most of my personal shooting with the Fuji was during the evening hours where 3200 was fine, however on one occasion, I was shooting after the sun had set and in that case I could have used the faster shutter speed provided by setting the upper limit to 6400. 

I was around the fifth person to reach the top of Diamond Head just as the sun was coming up. In this photo, several visitors defied the off-limits signs and ventured about 50 yards to another peak. I didn't pay much attention until this gentle…

I was around the fifth person to reach the top of Diamond Head just as the sun was coming up. In this photo, several visitors defied the off-limits signs and ventured about 50 yards to another peak. I didn't pay much attention until this gentleman climbed atop the metal frame. I like the contrast between the grass, concrete and the performance of this man balancing atop some old metal. With Honolulu in the background, he's on top of the world. 1/75 @ f6.4, ISO 200.

I'm really glad I choose the 35mm f2.0 R WR lens. Unlike the 35mm f1.4, which I previously used with the X-Pro1, It is smaller, quieter and weather resistant, all things that came into play during this trip. Another thing that I appreciated about this lens is the focal length. At a 50mm equivalent, it has a nice reach, yet still works in close situations. I will probably still purchase something wider, but I'm not in any hurry.

Something else I realized was that within a half hour of me reaching the summit of Diamond Head, I was joined by the entire country of Japan. Seriously, it did get really crowded and most of the visitors continued to take photos of the rising sun, p…

Something else I realized was that within a half hour of me reaching the summit of Diamond Head, I was joined by the entire country of Japan. Seriously, it did get really crowded and most of the visitors continued to take photos of the rising sun, probably long after it made sense. But as I made my way back down, I wanted to take a photo that would give a sense of the crowd, when I spotted this woman taking a picture of the sunrise. I turned, made three frames and keep moving. 1/120 @ f6.4, ISO 200.

The autofocus was really quick and the added ability to move the focus area around quickly using the joystick was a welcome addition. In a few instances when shooting on the street, I reacted quickly and the focus was locked on without me having to think about it. Like all the previous mirrorless cameras I've used, you do have to make sure the camera "awake" or you could experience an initial delay.

On Oahu's North Shore, there are hundreds of spots to pull over and explore the coast with your camera. The weather was not great and most of the morning I was dealing with volcanic fog, or VOG, as the locals call it. Eventually, as I continued to d…

On Oahu's North Shore, there are hundreds of spots to pull over and explore the coast with your camera. The weather was not great and most of the morning I was dealing with volcanic fog, or VOG, as the locals call it. Eventually, as I continued to drive along the coast, this tidal pool caught my attention and I focused on the lone snorkeler and the range of subtle color changes throughout the scene. 1/680 @ f5.6, ISO 200.

I loaded the dual card slots with San Disk 32mb SDHC cards, capturing monochrome jpegs to one and raw files to the other. Not sold on this. I still really like seeing the results in monochrome as I shoot, but I also utilized the built-in WiFi a lot with this camera. It's how I transferred my photos to my phone and iPad then shared on social media during the trip. However, since I was caputing in monochrome, if I wanted to use a color version, I had to first do an in-camera raw conversion. Again, this is something I'm going to have to work on.

On my last night in Hawaii, I was walking back from dinner along Waikiki Beach watching all the tourists line up to photograph the sunset. It was a nice sunset, however with nothing spectacular to put in the foreground, I was drawn to the color refl…

On my last night in Hawaii, I was walking back from dinner along Waikiki Beach watching all the tourists line up to photograph the sunset. It was a nice sunset, however with nothing spectacular to put in the foreground, I was drawn to the color reflected in the receding waves. A different view of the setting sun. 1/40 @ f3.2, ISO 200.

There is no doubt the X-Pro2 is now my everyday carry-around camera. It handled well in all the shooting situations I found myself in and the 24 megapixels images are just beautiful. Off to Portland, Oregon, next week, so more to follow.


FUJIFILM X-PRO2 INITIAL SETTINGS

Fuji Xpro2 with XF 35 f2.0 lens, two SD cards, extra batteries and a soft shutter release button. Details and links appear at the end of this post*.

Fuji Xpro2 with XF 35 f2.0 lens, two SD cards, extra batteries and a soft shutter release button. Details and links appear at the end of this post*.

I finally got my hands on the new Fujifilm X-Pro2. And like with every new or loaner camera I receive, I downloaded the manual and read it (I highly recommend this). In this case, I read it several times even before the camera arrived.

Then once the camera was in front of me I went through all the menus and adjusted the settings in a way that makes sense to me and will best compliment my shooting style.

Below are the changes to the factory settings I made:

IMAGE QUALITYFINE+RAW: I prefer to shoot with this set up so that I can take advantage of Fuji's film simulation options with the jpegs while always having the raw file to process anyway I want. Taking advantage of the X-Pro2s two SD card slots means I have the jpegs on one and raw on the other. 

FILM SIMULATIONACROS-Ye FILTER: ACROS is a new monochrome film simulation option on the X-Pro2, so I'm giving it a try. Additionally, I've added the yellow filter (you can also add a red or green filter) which slightly enhances contrast and darkens the sky.

LONG EXPOSURE NROFF: Will activate if needed, but see no reason to leave on until then.

AF ILLUMINATOROFF: One of the advantages of mirrorless cameras is the ability to blend in, so the last thing I want when shooting at night or in dark situations is to draw attention myself with light.

AF+MFON: This setting allows me to manually adjust focus while the shutter button is pressed halfway. The camera must be in focus mode S for this work.

INSTANT AF SETTINGAF-C: This tells the camera what autofocus setting I want to use when I press the AF-L button while the camera is in manual focus mode.

CORRECTED AF FRAME ON: This adds a second focus frame to the display in the optical viewfinder for distances of about 1.6. Corrects for parallax inherent in rangefinders. 

SHUTTER TYPEES ELECTRONIC SHUTTER: Eliminates shutter noise and used for the same reason I turn off the AF illuminator and turn all other sounds off. The less attention I draw to myself when shooting, the better.

ISO AUTO SETTINGMAX SENSITIVITY 3200 and MIN. SHUTTER SPEED 1/30: I started using auto ISO on my X100S about a year ago and really like not having to worry about making changes when moving from inside to out or in and out of the shadows. Besides, if I change my mind it is easy and quick to change the ISO using the dial located on top of the camera.

SOUND SETTINGALL OFF: It should be obvious by now.

IMAGE DISPLAY1.5 SEC: One of the coolest things about this camera, like others in Fuji lineup is that a preview of the photo you just took appears in the viewfinder of the camera. It gives you instant feedback, especially when using the optical viewfinder.

FOCUS SCALE UNITSFEET: What, am I in Europe?

FOCUS LEVER SETTINGON: One of the new features on the Xpro2 is a joystick located on the back of the camera that enables you to move the focus-point around the viewfinder. This setting makes the joystick active.

EDIT FILE NAME - Changed the SRGB name to JFWP and the AdobeRGB name to JFW. No reason other than I can and after all, how boring is DCS.

CARD SLOT SETTING (STILL IMAGE)RAW/JPG: I really like having two card slots in this camera. The second card slot can be used as overflow or as backup, but as mentioned previously, since I'm shooting both raw and jpegs, this setting allows me to separate them on two different SD cards.

WIRELESS SETTINGS - GENERAL SETTINGS: Changed the wireless name to FUJIFILM-JFWPHOTO.

Once I've had a chance to spend some time shooting with this camera, I'll give you my thoughts and also update you on any changes I've made to the list above.

Fujifilm X-Pro2 Body (Black)

Fujinon Xf35mm F2 R WR - Black

Wasabi Power Batter (2-Pack) and Charger

SanDisk Extreme PRO 32GB SDHC memory card

Neewer 10mm Diameter Red Plan Metal Soft Shutter Release Button