FLICKR TOP TEN - PART I

Manneken Pis
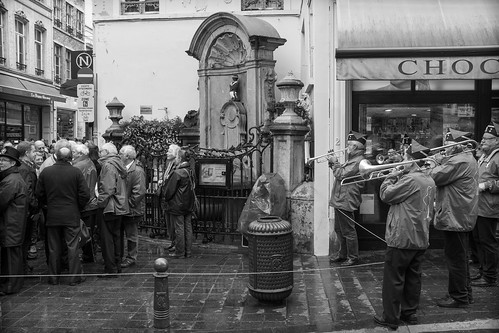
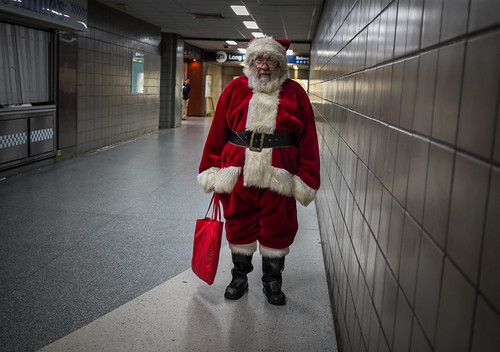
October 17, 2013. Title: Manneken Pis Description: The small bronze fountain sculpture in Brussels, Belgium, depicts a naked little boy urinating into the fountain's basin. Stats: 4,947 views, 1 fav. Tags: fuji, X100S, Europe, Brussels, Belgium, Manneken Pis, pee, boy, Black and White, sculpture, fountain, attraction, tourist. Groups: Fuji x100s, Fuji X100s B&W, Digital Black and White.
I was recently looking at my Flickr stats and thought it would be interesting to take a closer look at my top ten most viewed photographs and see what, if anything, I could learn about them or learn about Flickr.

First, let's look at my stats. I've been a member since 2008 and posted 661 photos that have been viewed 172,321 times. I currently follow 123 photographers and have 105 following me.

Santa Claus
December 24, 2013. Title: Santa Claus Description: Hope that the Long Island Railroad guides him home safely tonight. Merry Christmas! Stats: 3,709 views, 31 faves, 1 comment Tags: fuji, X100S, Santa Claus, Penn Station, New York City, Christmas, holiday, St. Nick, NYC. Groups: Fuji x100s, New York Photography, The Candid Frame, in explore.
In part one of this two-part post, I share the top five along with relevant information about each photo and try to see if I can understand why these photos rose to the top.

The number one photo, Mannekin Pis, with over one thousand more views than the number two photograph, is somewhat of a mystery to me. First, I don't think it is a particularly remarkable photo although I do like it, but is it a 1000 times more remarkable than any other photo on my page. My only guess on why this is at the top has to do with tags. And if this is the case and you go back and read the tags under the photo you might be a little disturbed. Unintentional on my part, but who knows what people are searching for. Also, having been to Belguim a half dozen times in the past three years, I know that there is always a crowd around this site, so maybe it has nothing to do with specific tags.

Stairwell Portrait
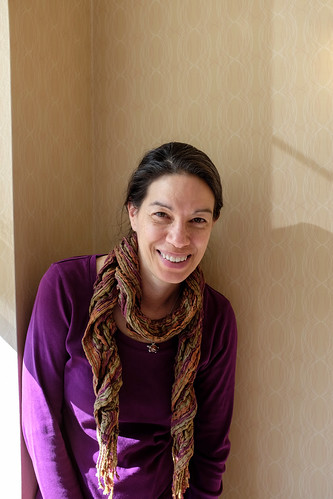
June 1, 2013. Title: Stairwell Portrait Description: Fuji X100S portrait taken in the stairwell of the Marriott Residence inn in Mississagua, Ontario. Stats: 3,074 views Tags: blog.jfpwhoto.com, Toronto, Ontario, Canada, portrait, light, mississagua. Groups: None.
The number two photo is one that I do like and is currently featured on my website. It also was featured in Explore on Flickr which I'm sure added to the total number of views, especially if everyone who received a new digital device on Christmas morning was browsing Flickr.

Number three is a very simple portrait, taken in a few seconds, mostly to test the capabilities of a Fujifilm X100s that I had on loan before I decided to purchase the camera myself. I have very few portraits on posted to my Flickr site, so maybe portraits just do better. This photo also was never shared to a group and I misspelled Mississauga in both the description and tags. (Flickr updated with correction)

Cornfield
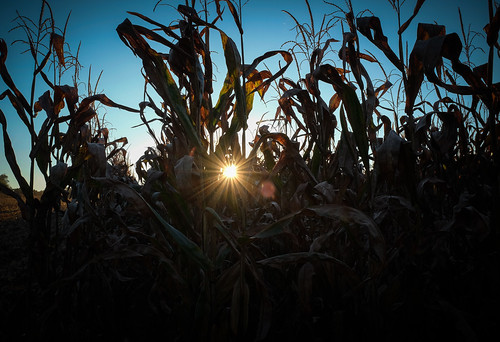
September 14, 2013. Title: Cornfield Description: None Stats: 2,656 views, 48 faves, 4 comments Tags: Kentwood Park, Md., USA, Delaware Bay, Chesapeake Bay, Bridge, light, Lens Flare. Groups: None.
At number four is a photo titled Cornfield and it is one that I didn't even upload until I happened to see the Flickr blog post with the theme of starbursts and remembered that I had taken this photo earlier that year. I posted the photo and it was picked up by Flickr and featured, which explains the number of views, despite no description and not being shared with any groups.

And like the first photo, I don't think the fifth most viewed photo, the ceiling of the Armenian Classroom taken during a visit to the University of Pittsburgh for my son's graduation, is all that great. It could be the title, or detailed description that helps people find this photo.

Armenian Classroom
April 28, 2013. Title: Armenian Classroom Description: The ceiling of the Armenian Classroom located in the University of Pittsburgh's Cathedral of Learning. The Nationality Rooms are located on the first and third floors and were designed to represent the culture of various ethnic groups that settled in Allegheny County and are supported by these cultural groups and governments. Stats: 2,543 views, 4 faves, 3 comments Tags: Pittsburgh, Pa. USA, Armenian Classroom, University of Pittsburgh, Cathedral of Learning. Groups: Fuji X10, X20 and X30, Fujifilm X10, digital compact only -- p1 / a2 -- open EXIF --.
If you are on Flickr, check your stats which can be accessed in the drop-down menu under You at the top of the page. In Part II of this blog post, I'll share number five through ten. 

PASSPORT PHOTOS - IT'S REALLY NOT THAT HARD

Examples of proper passport photographs from travel.state.gov.
It happens to all of us, professionals and amateurs alike. You can almost hear the question coming before the speaker opens his or her mouth. DO YOU DO PASSPORT PHOTOS!

Before you hang your head, roll your eyes or something worse, consider your options.

Of course, you could tell them that for around $12 they could go to a drug store or any number of stores that are set up to do this kind of thing. You could let them know that in certain city's there are mobile studios set up right outside the immigration building that will do it lickety-split.

Or consider for just a moment that you can invest ten minutes of your time and take the photo yourself.

And finally, maybe you are the one who needs a passport photo. After all, you have all the equipment to get it done, so why would pay someone else to do it.

Maybe it is so easy to do that even if you are reading this and don't consider yourself a photographer, you'll be able to do it.

Using the Department of State's free photo tool takes all the guesswork out of crop and sizing your final image.
What do you need?

A digital camera (even a new phone would do), a white or off-white wall and plenty of natural or artificial light.

What you don't need is software or more specifically expensive software such as Adobe Photoshop to crop and size your photos. So if this was the barrier that kept you from fulfilling the passport photo request, keep reading.

The most time-consuming and intimidating part of the process for most people is normally the sizing of the final image, according to very specific guidelines from the federal government. You've heard the whole "2 x 2 inches sized such that the head is between 1 inch and 1 3/8 inches from the bottom of the chin to the top of the head." What, and how do I make that happen?

This is one of the few times that the government has made something really simple. Upload you photo to this website and use the tool to resize and save the photo. That's it. It takes all the guess work out of the sizing and cropping process.

Unless you have a photo printer in your home, you will still need to visit that drug store to print your new passport photo on either matte or glossy paper, but at 29¢ per print, you can also afford to print a few extras for Mom.

Additional resources:

Photographer's Guide
Photo Requirements
Frequently asked photo questions

5 TIPS FOR PHOTOGRAPHING IN MUIR WOODS

Occasionally, some light makes its way to the forest floor which adds some nice contrast. Fujifilm XT1, 0.5 sec @ f11, ISO 200.

Occasionally, some light makes its way to the forest floor which adds some nice contrast. Fujifilm XT1, 0.5 sec @ f11, ISO 200.

If you are visiting the San Francisco Bay area, I urge you to take some time and visit Muir Woods National Monument. Located just 12 miles north of the city in Marin County, California, and part of the Golden Gate National Recreational Area, Muir Woods features 240 acres of old-growth Coastal Redwoods and plenty of photographic opportunities.

I recently spent five hours exploring the park and hope that you will benefit from the five photographic tips below.

1. Lens selection. I would probably leave the telephoto behind, but that doesn't mean you need to bring only super wide-angle lenses. The Coastal Redwoods are big and everywhere, so you will not need a telephoto to see them, but adding something in the 70-120mm range would allow you to compress a scene or reach some trees that may be a little further off the path. A longer lens could also come in handy if you want to aim up into the canopy.

As someone who does not shoot a lot of verticals, this location was the exception. Fujifilm XT1,1/2.3 @ f18, ISO 200.

As someone who does not shoot a lot of verticals, this location was the exception. Fujifilm XT1,1/2.3 @ f18, ISO 200.

2. Don't forget the tripod. You will be doing a lot of walking during your visit and you might be tempted to leave the tripod behind. Don't. Even during a bright sunny day, not much light filters down to the forest floor, forcing you to shoot at very slow shutter speeds even if you have fast lenses. And even though tripods are allowed in the park and the paths are fairly wide, remember to be courteous to other visitors, especially during busy times.

"This is the best tree-lovers monument that could possibly be found in all the forests of the world". - John Muir

3. Stay on track. Photography is allowed throughout the park, but you must remain on the paths and boardwalks. There is an easy loop path with an occasional trail that branches off. It took me about four hours to make the loop, but you could certainly do it in less. My recommendation would be to spend the whole day and plan on making several trips around the loop or take advantage of a ranger-led program.

There are a few places along the trail such as Cathedral Grove where you are able to get nice canopy shots from the trail. Fujifilm XT1, 0.3 sec @ f14, ISO 200

There are a few places along the trail such as Cathedral Grove where you are able to get nice canopy shots from the trail. Fujifilm XT1, 0.3 sec @ f14, ISO 200

4. Get there early or late. Normally this tip would refer to taking advantage of the best light, but in this case, it is more about the parking and avoiding the crowds. Parking is very limited, especially on weekends, but even during my weekday visit, I noticed parking was gone, even a mile down the road when I left the park around 2 p.m. Another option would be to take the Muir Woods shuttle which runs weekends from April 4th through October 25th. The park is open from 8 a.m. to sunset.

Don’t lose sight of the forest for the trees, or in this case, take the time and look for details among the trees.  Fujifilm XT1, 1/13 sec @ f4.5, ISO 200

Don’t lose sight of the forest for the trees, or in this case, take the time and look for details among the trees. Fujifilm XT1, 1/13 sec @ f4.5, ISO 200

5. Big picture - small picture. I was amazed by how much these Coastal Redwoods would impact me. Their size and beauty had me yearning to just shoot wide, take it all in with every frame. But that didn't always convey the true size of these magnificent trees as I reviewed the pictures. Force yourself, as I did, to try other focal lengths in order to achieve a different look. And if you have a macro lens, be sure to bring that too. There are incredible textures everywhere and plenty of interesting subjects on the ground if you can manage to look down.

Shooting from a low angle with a wide-angle lens enhances the grandeur. Fujifilm XT1, 1/8 @ f8, ISO 400.

Shooting from a low angle with a wide-angle lens enhances the grandeur. Fujifilm XT1, 1/8 @ f8, ISO 400.

Finally, be sure to take some time and relax during your visit. Since the lighting is fairly constant, there really is no need to rush, or limit your visit to the "best time" of the day for shooting. Find a bench, take a seat, and just enjoy this beautiful redwood forest that William and Elizabeth Kent donated to the federal government in 1908.

Download a PDF to learn more about the history of the park and the California Redwoods.

MAKING THE BEST OF WORLDWIDE PINHOLE DAY

Pinhole photo of a Saguaro cactus taken with a Nikon D4S. One-second exposure, aperture unknown.

Pinhole photo of a Saguaro cactus taken with a Nikon D4S. One-second exposure, aperture unknown.

I really enjoy pinhole photography and ever since I built a camera and took that first shot in 2013, I've made it a point to participate in the Worldwide Pinhole Photography Day (WPPD). This international event is held each year the last Sunday in April in order to promote and celebrate the art of pinhole photography.

Surrounded by digital in my full-time job, I enjoy the opportunity to produce an image on photographic paper using nothing more than a box with a tiny hole and some chemicals. It always provides a challenge and seeing a negative appear on paper as it sits in the developer, reminds me of excitement I felt the first time I stepped into a darkroom over 35 years ago.

So this year I was disappointed when I realized that due to an early Sunday flight to Tucson, Arizona, for an assignment, I would not be able to participate. After all, it would not be practical to bring my pinhole camera and chemicals with me. I briefly thought about pre-loading my camera and bringing it along, or maybe get up early and take a photo before my flight, but neither of these options excited me enough to do them.

During the flight, I thought about missing out on WPPD and that's when it hit me. What is a pinhole camera anyway? I realized I had everything with me in order to make one, a Nikon D4S with a body cap. One of the reasons I left so early from Washington, D.C., was so that I could arrive in Tucson early enough to spend some time in the Saguaro National Park before my assignment started on Monday. So I had the time and now I had an idea of what I would do.

The tools I used to make the hole in the camera's body cap.

The tools I used to make the hole in the camera's body cap.

After landing, I stopped at a local drug store and picked up a pack of sewing needles, a small roll of duck tape and a package of lighters. Total cost was $4.50. I secured a small pebble to the top of the needle using the duck tape and then after heating the tip with a lighter, I pushed it through the center of the body cap. It took a few tries, but really there was nothing more to it.

One big difference of course between this "pinhole camera" and mine is that I was able to see the results of my efforts on the digital display instantly and make adjustments until I had the proper exposure. Too easy.

It wasn't as much fun as previous years, but I can say that I participated in WPPD 2015, and that made it all worthwhile.

5 TIPS FOR PHOTOGRAPHING THE GOLDEN GATE BRIDGE

The Golden Gate Bridge a half hour prior to sunrise. 30 sec. @ f8, ISO 200.

The Golden Gate Bridge a half hour prior to sunrise. 30 sec. @ f8, ISO 200.

Before I get to my five tips, I will state right up front that much like my blog post,  Five Tips for Shooting Antelope Canyon, this was my first time photographing the Golden Gate Bridge. I say that only to admit that I'm not the expert and in fact, welcome comments, additional tips or even to tell me I'm wrong.

However, as a professional photographer, you might find it interesting how I approach a subject that I never photographed and only have a limited time to do so. In this case, I was in San Francisco for three days, but all of that time was not dedicated to taking pictures of possibly the most photographed bridge in the world. Also of note, all of the photos were taken with a Fujifilm X-T1 mirrorless camera that I had for review.

Consider a rental car or Zip car so you can get to locations away from the crowds, like this photograph of the bridge taken from Point Bonita Lighthouse just before sunset. 1/18 @ f22, ISO 200.

Consider a rental car or Zip car so you can get to locations away from the crowds, like this photograph of the bridge taken from Point Bonita Lighthouse just before sunset. 1/18 @ f22, ISO 200.

Also, while it is possible to get to the Golden Gate Bridge via public transportation, tour bus or even by bike, renting a car seems to be the easiest and most convenient way to get to many of the shooting locations, especially if you have limited time or want the ultimate flexibility to chase light.

1. Location, location, location.

There are numerous locations or vantage points to photograph the bridge and I'll cover just a few even though I'm sure locals have all kinds of hidden spots picked out.

I shot from three basic locations on the North side and two on the South or San Francisco side of the bridge. On the North, it was Vista Point, Battery Spencer, Marin Headlands (Hawk Hill) and on the South, Lands End, and the South Side parking lot.

Vista Point is the first exit after crossing the bridge heading north and while it offers an alright view of the bridge, my suggestion would be to skip the crowded parking lot and head down the hill towards the Coast Guard Station where you can view the bridge from a low angle. Then walk up to the Vista Point visitors center for an additional view.

A different look at the bridge from Battery Spencer. 1/1700 @ f3.2, ISO 400.

A different look at the bridge from Battery Spencer. 1/1700 @ f3.2, ISO 400.

After leaving Vista Point cross under the bridge and start the climb up Conzelman Rd. making Battery Spencer your first stop. This is a great location and it was the first place that I stopped to photograph the bridge. I was surprised how close the bridge was and you feel like you are at eye level with the bridge towers. Nice vantage point to shoot verticals too.

After leaving Battery Spencer, you continue to climb until you reach the highest point, Hawk Hill. From this vantage point, you get a great overview of the bridge with the city behind it. Don't forget to explore the old World War II batteries while you are there and if you continue on foot through former gun emplacement tunnels to the other side, you will have a bonus view of the Point Bonita Lighthouse.

There are several stopping points along the way so take your time and pull over every chance you get either on the way up or on the return trip, because the view is different and unique each time.

Screen shot from my iPad of the SunSeeker App showing my location and sun direction on the morning of March 17, 2015, as I was attempting to photograph the sunrise. One of the nice things about this App is that you can pick a day and time in the fut…

Screen shot from my iPad of the SunSeeker App showing my location and sun direction on the morning of March 17, 2015, as I was attempting to photograph the sunrise. One of the nice things about this App is that you can pick a day and time in the future so that there are no surprises, except for maybe rain and fog.

2. Timing is everything.

Make sure to leave yourself enough time and shooting days to capture the bridge during different times of the day. If you are planning to shoot sunrise or pre-sunrise from Hawk Hill, Conzelman Rd. is closed about a half mile from the top until after sunrise. There is a parking lot, so join the bicyclists and joggers as you make your way to the top. Not too bad, but don't be surprised as I was.

Once again, I used the Sunseeker App to determine sun direction which helps determine where I'm going to start and end my day. Knowing where the sun will be during certain times of the day can help you pre-visualize photographs as you drive around scouting locations.

The Vista Point visitor center gets crowded with both cars and people. I found most people moved on quickly so if you want a particular shot, just wait a few minutes. 1/100 @ f11, ISO 200.

The Vista Point visitor center gets crowded with both cars and people. I found most people moved on quickly so if you want a particular shot, just wait a few minutes. 1/100 @ f11, ISO 200.

3. Avoid the crowds.

It is clear that you are not the first person who has thought about photographing the Golden Gate Bridge, so be prepared for crowds, especially at the visitors centers. Sometimes you may also have to pass by a pull-over because it is full, but remember there will be another. It was my experience that if you have a little patience while people grab their selfies, they will move on allowing you to get your shot.

And as in most situations, you lessen your chance of running into crowds by getting there early and staying late. After all, isn't that the best time to shoot anyway? So take a break in the middle of the day and head over to Sausalito for some tacos and Mexican beer at the Salsalita Taco Shop while everyone else is fighting for a spot to photograph the bridge in the noon time sun.

Think about details and capturing pieces of the bridge, even from underneath. This was taken while walking from the Coast Guard station up the hill to the Vista Point parking area. 1/350 @ f9, ISO 200.

Think about details and capturing pieces of the bridge, even from underneath. This was taken while walking from the Coast Guard station up the hill to the Vista Point parking area. 1/350 @ f9, ISO 200.

4. Look for something different.

The temptation is to go wide and take in the entire bridge. That makes a nice shot and sets the stage, but don't forget about details. With a telephoto lens, you can pick out details from many of the shooting locations I mentioned previously, but there are also places to access the bridge from underneath. And while I didn't get the chance on this trip, you can also walk or bike across the bridge, which would certainly get you up close and personal.

Among the first photographs I took of the bridge, was as I made the short climb at Battery Spencer which puts you at eye level with the bridge towers and in this case almost in the clouds. 1/60 @ f10, ISO 400.

Among the first photographs I took of the bridge, was as I made the short climb at Battery Spencer which puts you at eye level with the bridge towers and in this case almost in the clouds. 1/60 @ f10, ISO 400.

5. Weather can be your friend.

I could state the obvious and just say that the weather, especially clouds and fog, are unpredictable in San Francisco, or I could tell you to embrace it and use it to your advantage. On my first day photographing the bridge, I could only make it half way up Conzelman Rd. before the visibility dropped to near zero. But those same clouds added something to my photos taken from Battery Spencer when they covered just the top of the bridge.

The point is, don't make a judgment from your hotel room downtown. Get out to the locations you scouted and see for yourself because you never know when the weather will change and maybe even change in such a way that takes your photograph from alright to awesome.

Photographed from the trail at Lands End. I rarely use presets, but something about this photograph reminded me of a classic postcard, so I added Yesteryear, and Rounded Corners White presets in Lightroom 5. 1/2000 @ f4, ISO 200.

Photographed from the trail at Lands End. I rarely use presets, but something about this photograph reminded me of a classic postcard, so I added Yesteryear, and Rounded Corners White presets in Lightroom 5. 1/2000 @ f4, ISO 200.

As I said at the beginning of this blog post, there are many more locations to explore and photograph the bridge such as Crissy Field, Fort Point, Point Cavallo, Baker Beach and many, many more. In fact, maybe three days is not enough time.

So make the trip, have fun, and when not photographing the bridge, there are all kinds of other wonderful locations around the city to photograph.