In Episode 1 of the VLOG, I document my backpacking trip to Avalanche Lake located in the high peaks region of the Adirondacks. I also wrote about that trip on this Blog in a post titled: Same Lake - Three Different Photographs.
While I'm not entirely convinced there will be an Episode 2, this was something that I challenged myself to produce and I really had fun doing it.
All the video was captured using a GoPro HERO4 Silver. For support and to film myself, I used the GoPro 3-Way Grip Arm. If the price of the GoPro grip arm gives you sticker shock, check out this selfie stick from HODA, which appears to be an exact copy.
Please feel free to leave a comment here or on my YouTube channel.
It was only a few months ago in a post titled Decisions, Decisions... Well, You Get the Point, I wrote about the decisions we have to make as photographers. As a quick reminder, these are not decisions about camera settings, etc., but the decision of where we choose to photograph from.
And now I have the answer to the question of can you be in two places at once. How to be there - and also there.
The answer came in the GoPro HERO3+ Black Edition, and not only can I be in two places, but if needed, be in three, or even more places at the same time. To be fair, photographers have been using remote or remotely triggered cameras long before GoPro came on the scene. But with the low cost, high quality and ease of use of GoPro cameras, it has never been easier to work with remotes.
Just prior to lift-off I triggered the GoPro and it is already taking a still image every five seconds allowing me to concentrate on photographing everything else.
In that previous blog post, I gave the example of making the tough choice of whether to ride aboard the Navy's only manned airship or stay on the ground during an assignment. In that case, I concluded that I made the right decision by staying on the ground, but it still didn't lessen the fact that I wanted to ride in the blimp.
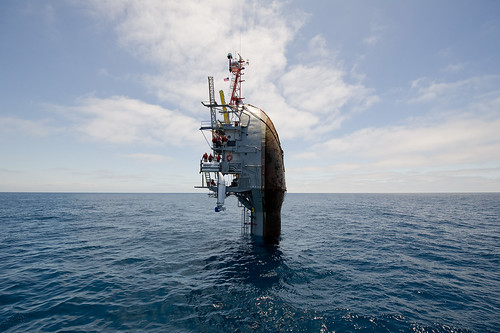
When assigned to once again photograph the blimp, I was sure that I would get the opportunity to ride aboard. After all, it only made sense, right? So imagine my disappointment when I received word the day before the assignment that due to newly installed scientific equipment, space was limited. Guess who was getting bumped?
So did I cancel the shoot? Of course not, because after all I would still get to photograph the blimp. However, I did start to think about how I could get the photographs I wanted from inside the cockpit without actually being inside the cockpit. I briefly considered handing a camera to someone who would be on board, but somehow that never really works out.
A test shot (selfie) after positioning and mounting the GoPro in the blimp.
Even though I've been an owner of a GoPro for several years and have had some success with it, I just don't think I've ever really used it to its fullest. That is until I obtained the newest version. Using the App and Wi-Fi to control the camera has really made me want to use this camera more than ever before. Also, for some reason the ability to see what the camera sees, again via the App, really resonated with me.
Once I made the decision to use a remote camera and take the viewer inside the airship, I called the squadron and let them know that I wanted to place a camera aboard the airship. I received the permission I needed, arrived early on the day of the assignment and using a suction cup mount, I mounted the GoPro as far forward as I could. I successfully pulled off the picture I had in my mind. Actually, I think this picture is better than if I was aboard, but don't tell the Navy that.
How the photo appeared on the home page of Navy.mil.
Tips for using your GoPro as a remote:
1. While it's always a good idea to get to an assignment early, if you plan on using remote cameras, then it is critical that you arrive early. You don't want to rush the process or not leave yourself some time to test everything out.
2. Be sure to let everyone involved know what you are planning on doing and seek permission if necessary. There may also be the instance when you need someone to turn the camera on for you.
3. As events begin to unfold, open the App and make sure that you are connected to the camera via Wi-Fi.
4. Obviously the GoPro is capable of shooting both videos and still photographs, but if it is stills you want, then consider setting the GoPro to shoot interval photographs, such as every five seconds or so. The video below is GoPro footage taking during the R/V Neil Armstrong commissioning. Once I started the camera, I was able to give my full attention to shooting stills from a position about 25 yards away.
5. Once you start the GoPro, I find it is best to forget about it and concentrate on the photographs you are taking. Worrying about the remote camera or taking the time to over monitor means you might miss a shot with the primary camera.
FLIP celebrating 50 years of operations by "flipping."
As photographers we have to make decisions and choices all of the time. Decisions such as camera and lens choice, f-stop and shutter speed, white balance, RAW or JPEG and a whole host of other things that go into making pictures.
Admit it, this is what you were thinking when you read the title, right?
And you would be right that for 90% of my assignments these are the biggest photographic decisions I make. But they are certainly not the toughest decisions. Given time and experience those decisions start to become second nature. The toughest decisions I have to make is where I'm going to photograph from.
Two assignments come to mind, but there have been many others over the years.
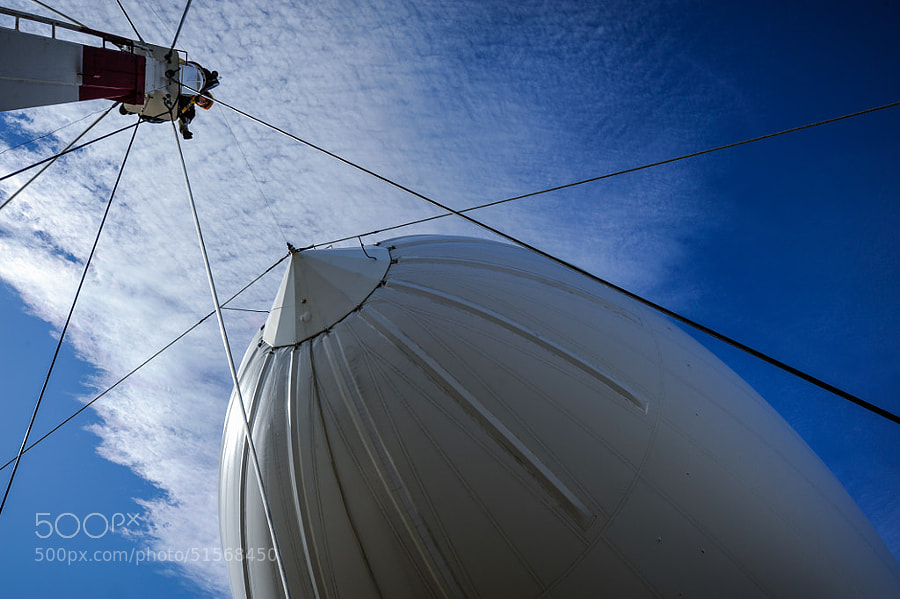
The first was an assignment to photograph the Navy's Floating Instrument Platform (FLIP) off the coast of San Diego, Calif., where I was given the choice between riding aboard FLIP or riding aboard a tug carrying media and VIPs. My first instinct was to ride aboard FLIP because that would be the cool thing to do. Very few people get that opportunity and it's something I've wanted to do since I started working at the Office of Naval Research. But deep down I knew that I needed to get photos and video of FLIP, well flipping, and that would not have been possible if I were aboard.
It would not have been possible to capture this photograph if I choose to ride aboard. the best case would be that I could do both, but that is not always possible.
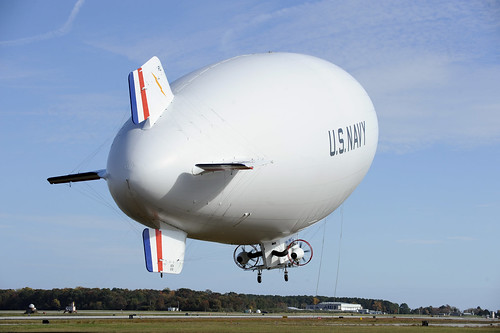
Then just recently I was assigned to photograph the Navy's only manned airship, or blimp, located at Naval Air Station Patuxent River, Md. Like FLIP, I've wanted to ride in this for some time and thought I would finally get the opportunity. But again I had to make a tough decision; am I going to get the best photos of the blimp from inside the blimp? And like FLIP, I wanted to be aboard because that would be a very cool thing to do, but I knew that the best chance to photograph the blimp was to stay on the ground.
We make photographic decisions all the time, but the easy ones really are camera and lens, f-stop and shutter speed and all those other things you thought really mattered.
When I reflect on these two assignments, I know I made the right decisions and the images speak for themselves. In the case of FLIP, the video has been used by Discovery Channel, National Geographic and others and the photos continue to get published even one year later, most recently by the weather channel.
Photo of the Navy's airship that has been added to my portfolio on 500px.
Too soon to tell if the blimp photos will take off, but I'm very happy with the results and even used one in my portfolio. That's when the right decision pays off.
So is there ever a way to be in two places at one time? You might have noticed if you watched the FLIP video that there is onboard footage shot as FLIP transitions from the horizontal to vertical position. I did have the opportunity to mount a GoPro camera aboard and then coordinated with an on board scientist to trigger the camera just before operations began. He came through which proves that it is possible to be in two places at once, virtually at least.
You can also use a remote trigger on a second camera if you are close enough. If you are too far away to trigger a remote, then set the camera's timer to fire a frame at certain intervals. Who knows, you may get lucky as I did when I set a GoPro to shoot one frame every 30 seconds during a satellite launch in Kodiak, Alaska. I was three miles away when the image was made.
Two places at one time. GoPro camera allows me to capture launch while I'm three miles away with a 600mm.
I've just finished packing for the Arizona trip and wanted to share what gear I'm taking along and some of my thoughts behind it. I'll break this down into three sections, camera, computer, and accessory.
I'm taking three cameras, the Nikon D3s and D700, and my new Fuji X10. I thought about not taking the D700 as a second body on this trip since I will primarily be shooting landscapes and didn't think I would need a second body affixed with another lens for quick reaction. In the end however, I thought if something happened to the D3s, the only backup would be the X10 and while I'm learning to really like that camera, it just does not compare to a full frame DSLR in quality.
I'm also bringing an Nikon SB900 in case I need fill flash especially if I'm shooting during the middle of the day.
COMPUTER GEAR:
Apple 15" Powerbook, iPad, LaCie Rugged Mini 1TB hard drive, SanDisk Firewire 800 card reader, Photo Mechanic, Adobe Lightroom 4.0, Photoshop CS4, Verizon MiFi.
The plan of course is to process images during the trip, as well as continue to update this blog, so I'm bringing my 15" Powerbook. Simple work flow will be to offload camera cards each day, copying contents to desktop then backing up to a portable hard drive. I will use Photo Mechanic to rename and caption images, then import into LightRoom 4.0, and finish off in Photoshop CS4.
Other than the laptop, I am also bringing my iPad, along with a camera connection kit, on this trip. And it is not just for entertainment, but for practical purposes. Other than the photo apps that may see some use, I rely on the Sun Seeker app which provides you with sunrise and sunset times, shows a map view of sun direction for each daylight hour and 3D views of the solar path. In fact I've already studied the direction of light during the time and day when I will be in certain locations. Two other non-photo apps I will use on this trip are The Weather Channel app and SkySafari 3.
ACCESSORIES:
Gitzo Series 00 Carbon tripod, Zacuto Z-Finder Pro, PocketWizard Plus, Blackrapid camera strap, battery chargers, mouse, Belkin surge protector, Lexar professional 600x 32GB card, Lexar professional 400x 16GB card (2), SanDisk Extreme 16GB, SanDisk Extreme 2GB, Tenba sandbag,
So far it's been pretty straight forward, but the details are in the accessories. I have two tripods, a Bogen Model #3033 that I've owned since 1986. It is a sturdy, dependable tripod, however it is very heavy and not very compact. The other is a Gitzo Series 00 Carbon 6X with a Arca-Swiss Monoball Z1 ballhead. This is a great tripod for travel and backpacking because it is so light, but my concern is that it may be too lightweight, especially for star photography, so I'm bringing a sandbag to help steady along with hanging my backpack should help.
In order to assist with focus at night and to make sure everything is sharp during the day, I'm bringing a Zacuto Z-Finder Pro 2.5x eyepiece which should give some piece of mind as I shoot. For triggering the camera, I'm going to use a PocketWizard Plus. Perhaps a bit of overkill, but without a cable release, this is the next best thing.
To transport most of the gear, I'm using a Kelty Redwing backpack. Not a photo backpack you say? That's right. I was at REI and looking at backpacks when the Kelty caught my attention. Plenty of room, good support and the right size to also be used on a two to three backpacking trip. As I've mentioned previously, I use Think Tank test drive bags (now called Lens Changers) and pouches to protect my cameras and lens in the bag. The main compartment has a place to hold my laptop and the front portion has room for my iPad, pens, notebook, phone, etc. This pack also has side pouches to stow additional items plus they have a pass through that will allow me to carry a tripod. The final bag will be a Think Tank Change Up Belt Pack. I've mentioned this bag before in my GOING LIGHT(er) post.
I'll carry on most of the camera gear in the Kelty and the Change Up. Things like chargers, cables and of course clothing will all go in my checked bag.